


Discover how to effortlessly import various types of data into PivotXL. This guide covers everything from basic cell data and transactional records to advanced roll-up mappings and custom scripts, enabling seamless integration and efficient data management for all your business needs.
Cells Upload
The Cell Upload feature in PivotXL streamlines data integration by allowing seamless uploads based on cubes and dimensions. Using dimension header names from your file, you can validate existing dimension members or add new ones effortlessly. Once your data is ready, select the relevant cube, dimension, and time frame to upload and organize your data. This feature enhances data management with precision and flexibility, ensuring a smoother workflow for your business processes.
1. Log in to the PivotXL application and navigate to the Upload option from the left-hand menu to initiate the data integration process.
2. Click on Cells to begin uploading data aligned with cubes and dimensions.
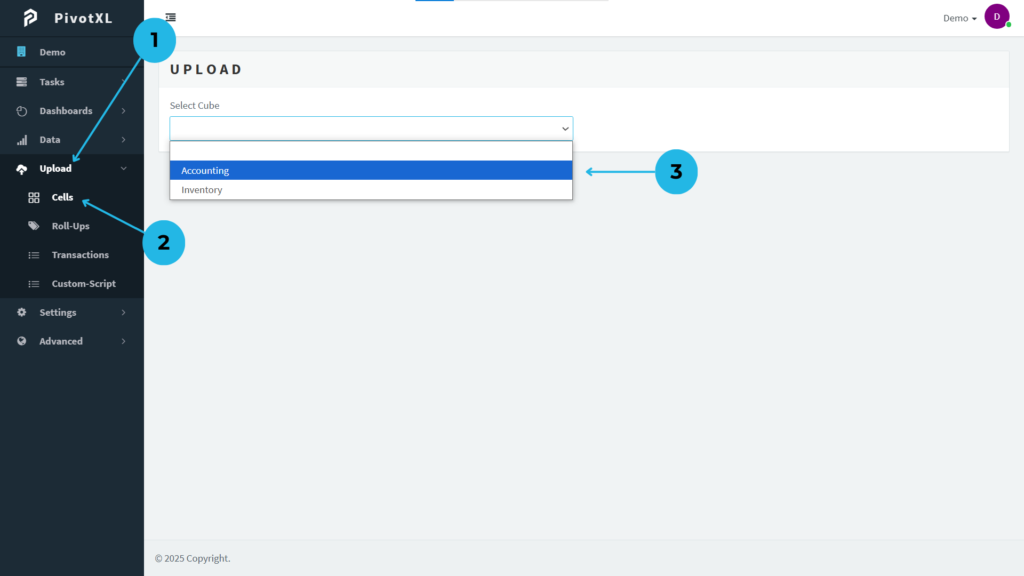
3. Select your preferred cube for accurate data mapping and seamless integration.
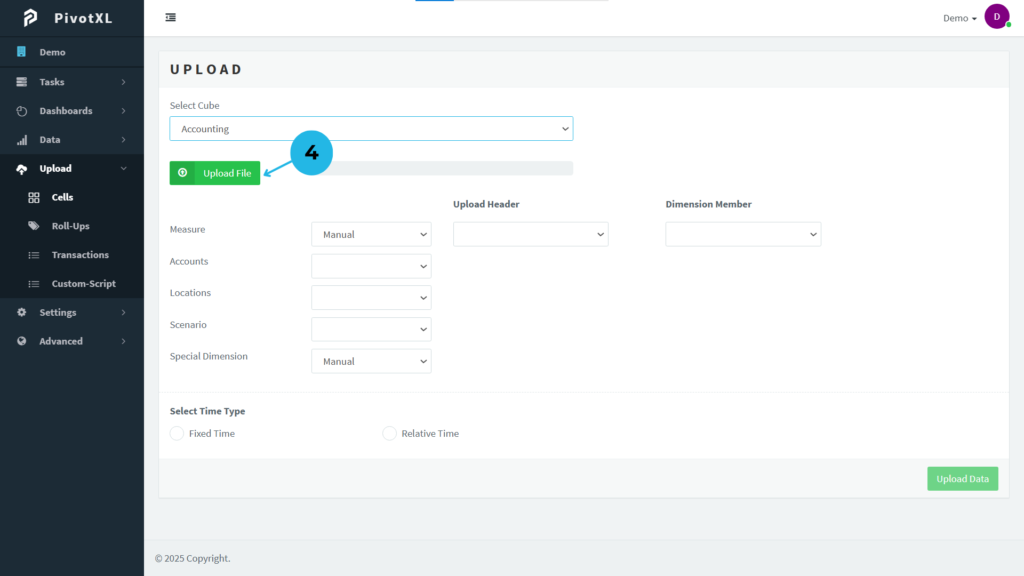
4. Click the Upload File button to locate the data file you wish to import.
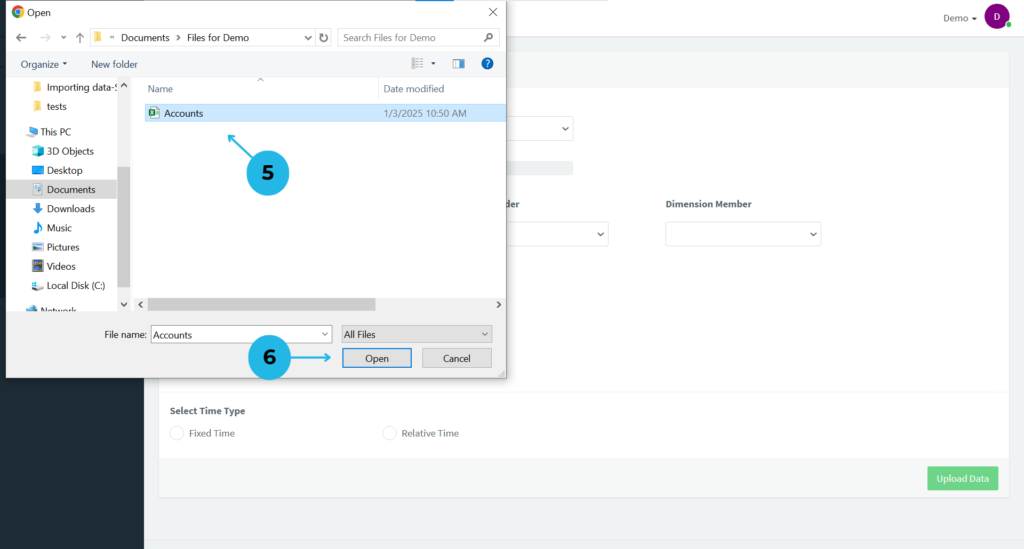
5. Choose the desired file in CSV format (the only supported format) to ensure compatibility with the system.
6. Open the selected file to start the upload, enabling efficient data processing and alignment within PivotXL.
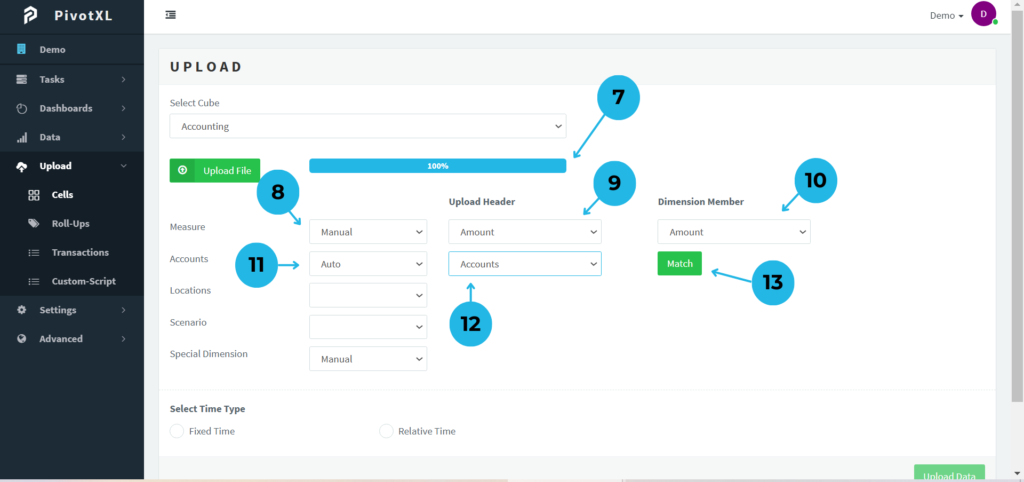
7. Ensure the file upload process reaches 100% to confirm successful data integration.
8. Adjust the measure to “Manual” for precise value assignment from the uploaded file.
9. In the upload section, map the ‘Amount’ header from your CSV file to the corresponding measure dimension.
10. Choose the appropriate dimension member from the dropdown to ensure accurate data mapping.
11. Choose the Auto option for the Accounts dimension, as it allows you to select multiple dimension members for data upload, unlike the Manual option which only allows one.
12. In the upload section, map the ‘Accounts’ header from your CSV file to the Accounts dimension.
13. Click the Match button to display matched and unmatched members in the Accounts dimension of the cube, based on the Accounts list from your uploaded file
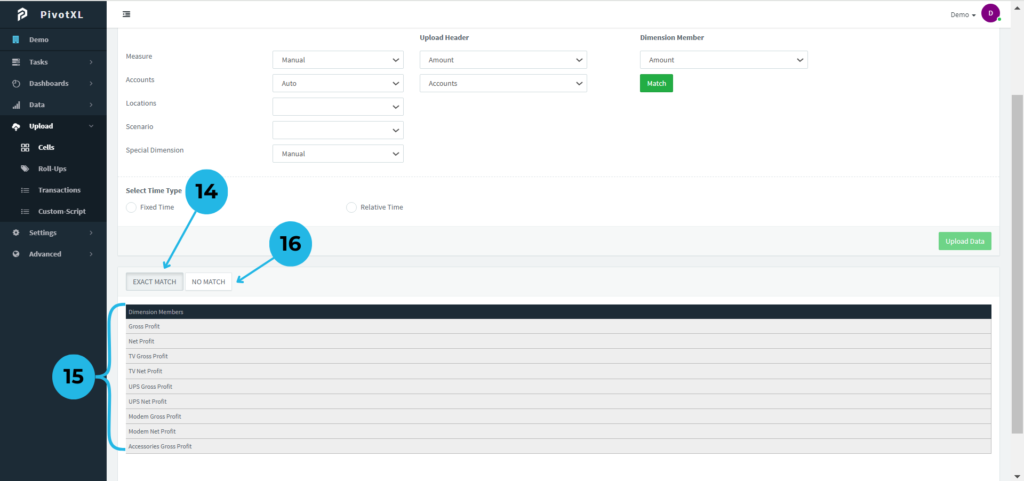
14. Displays only the dimension members in Accounts that have an exact match.
15. Shows the Accounts dimension members matched with the Accounts list from the uploaded file.
16. Identify and review the dimension members that do not match the uploaded file.
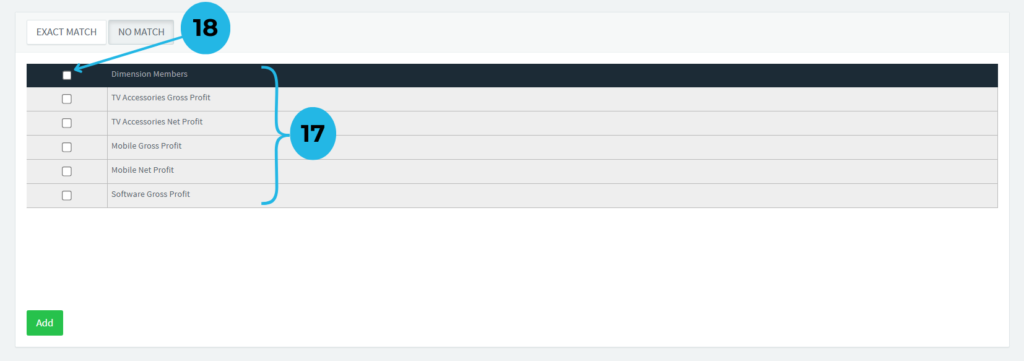
17.Displays the Accounts dimension members that do not match any entries from the uploaded file, highlighting discrepancies with the cube dimension members.
18.Use the dimension member checkbox to select all new Accounts members at once or choose multiple specific members for precise updates.
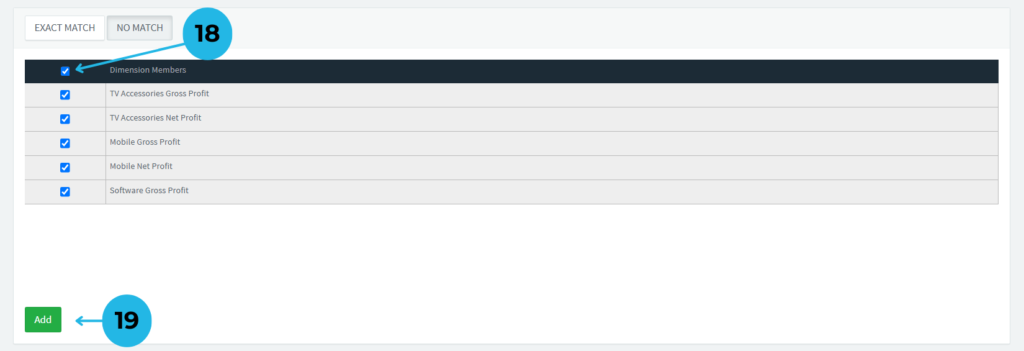
19.Click the Add button to include the selected dimension members in the cube dimension.

20.Once unmatched members are added, an empty message stating “No data found” will appear. Then, click the Exact Match button.
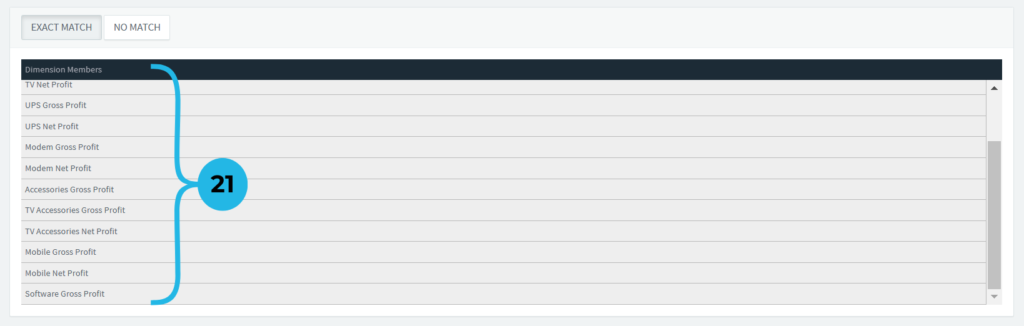
21.All dimension members have now been successfully added to the Accounts dimension.
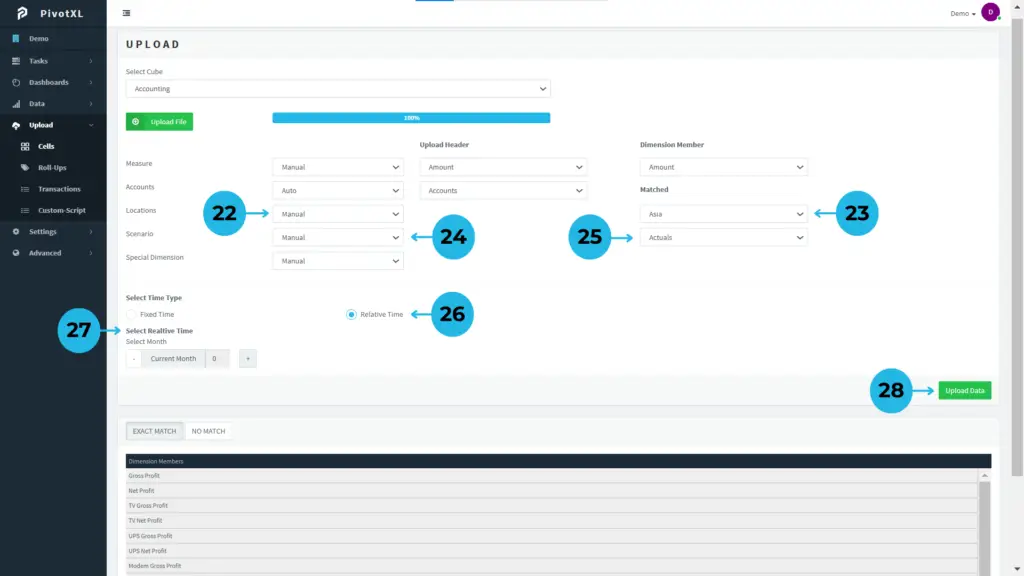
22.Choose the Manual option for the Location dimension.
23.Pick ‘Asia’ as the desired member in the Location dimension.
24.Choose the Manual option for the Scenario dimension.
25.Pick ‘Actuals’ as the desired member in the Scenario dimension.
26.Specify the time type for storing the uploaded data. Select Relative Time for flexibility.
27.Choose the current month for Relative Time (use the “-” icon for past months, “0” for the current month, and “+” for future months).
28.Review all cell upload details to ensure accuracy, then click the Upload Data button to complete the process.
Smart Transactions for Efficient Data Uploads
With rule-based transactions, you can precisely import data by applying filters to file data, seamlessly creating new cube combinations. This method ensures accurate data mapping for both new and existing configurations.
Apply custom filtering rules to handle complex data uploads effortlessly. Save frequently used rules in a Rule Book to streamline future processes and maintain consistency.
1.Open the PivotXL application and click on the Upload option from the left main menu.
2.Choose the Transactions submenu to begin a structured, rule-based data import process.
3.Click the Upload File button to upload your data in CSV format.
4.Monitor the upload progress bar, which confirms completion when it reaches 100%.
5.Click the Uploaded Data button to initiate the process for creating rules and mapping data.
1.A Verify Data pop-up appears, showcasing sample data from your file to confirm accuracy and ensure the correct file selection.
2.Receive helpful notifications with guidelines on the expected data format, making validation easier.
3.View your file data in the suggested format. If adjustments are needed, easily modify the format directly to meet requirements.
4.Once verification is complete and the format is correct, click the Upload Data button to proceed with data import confidently.
1.View a comprehensive list of data from your uploaded file, complete with clearly defined headers for better clarity and reference.
2.Click the ADD RULE button to seamlessly create custom rules for precise data filtering, transformation, and mapping.
1.Open a new pop-up window to add your custom rule. Enter a rule name in the provided field and click the Add Rule Name button to create the rule.
1.After creating a rule, click the rule name to open its filter configuration options. Click ADD FILTER to define custom filters for the rule.
2.Choose the appropriate data format for filtering.
3.Select the file header associated with the chosen format.
4.Enter custom values in the text box under the corresponding column list to fine-tune filtering criteria.
5.Easily remove unnecessary filters by clicking the Delete icon.
6.Click Show to display a detailed list of the filtered data.
7.The data is clearly arranged with file headers for easy analysis and better visualization.
8.Click the Map to Cube button to map filtered data seamlessly into the cube structure for advanced analytics and reporting.
1.A new tab opens for mapping the filtered data. Choose the appropriate cube by selecting from the dropdown.
2.Select dimensions to build the required cube combination.
3.In the Uploaded Header section, map the file header specifically to the Measure field, as it updates the cube combination values.
4.Choose the relevant dimension member in the Measure Dimension to align the data accurately.
5.Specify the Time Type for the cube combination to ensure proper mapping.
1.Scroll down to access the Unmapped Data section, which presents data that was not filtered during rule creation.
2.View a detailed list of All Data from the uploaded file, providing a comprehensive dataset for deeper analysis and potential future mapping.
1.Easily create custom rules to filter and organize transaction data during uploads.
2.Click the Edit icon to update and rename existing rules for better organization.
3.Click the Delete icon to permanently remove a rule from the list.
4.Once you’ve defined your rules, click the Save Rule Book button to securely store the rule set for future use.
1.Open the pop-up, enter a name for the rule book, and click Add Rule Book to save it.
5.Quickly access your saved rules by clicking the Load Rule Book button to display a list of predefined rules, streamlining future data uploads.
1.Open the pop-up to load a rule book and select the desired rule book from the dropdown.
2.Click the Apply button to fetch the selected rule book.
3.After selecting, click the Delete button to remove the rule from the rule book.
1.Once the rule book is applied, the rule is fetched along with its details.
2.The filtered data in the rule book is displayed according to the set rules.
Roll-Ups Upload: Simplifying Dimension Member Grouping
The Roll-Ups Upload feature streamlines the process of grouping dimension members under specific Tags directly from your uploaded file. This powerful tool enables you to assign multiple dimension members to one or more Tags effortlessly, ensuring efficient organization and data management. It supports all cube dimensions, providing complete flexibility for organizing your data.
1. Log in to the PivotXL application and navigate to the Upload option from the left-hand menu to initiate the data integration process.
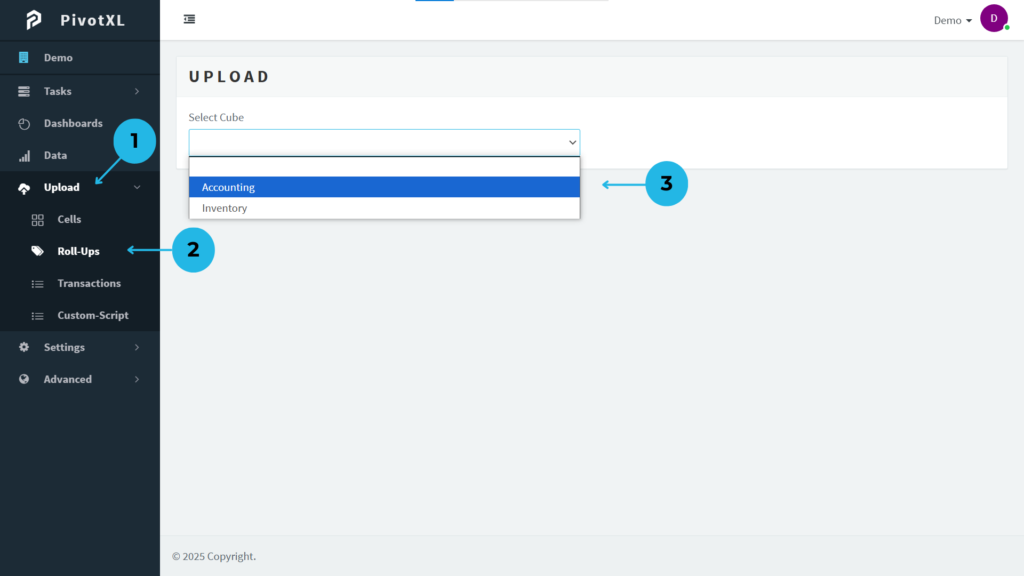
2. Click on Roll-Ups to begin uploading data aligned with cubes and dimensions.
3. Select your preferred cube for accurate data mapping and seamless integration.
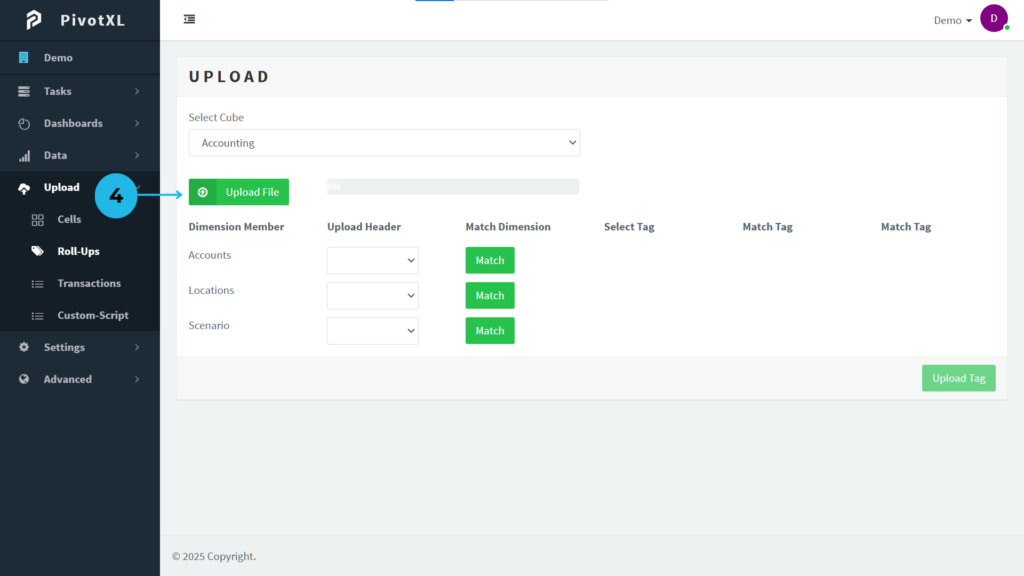
4. Click the Upload File button to locate the data file you wish to import.
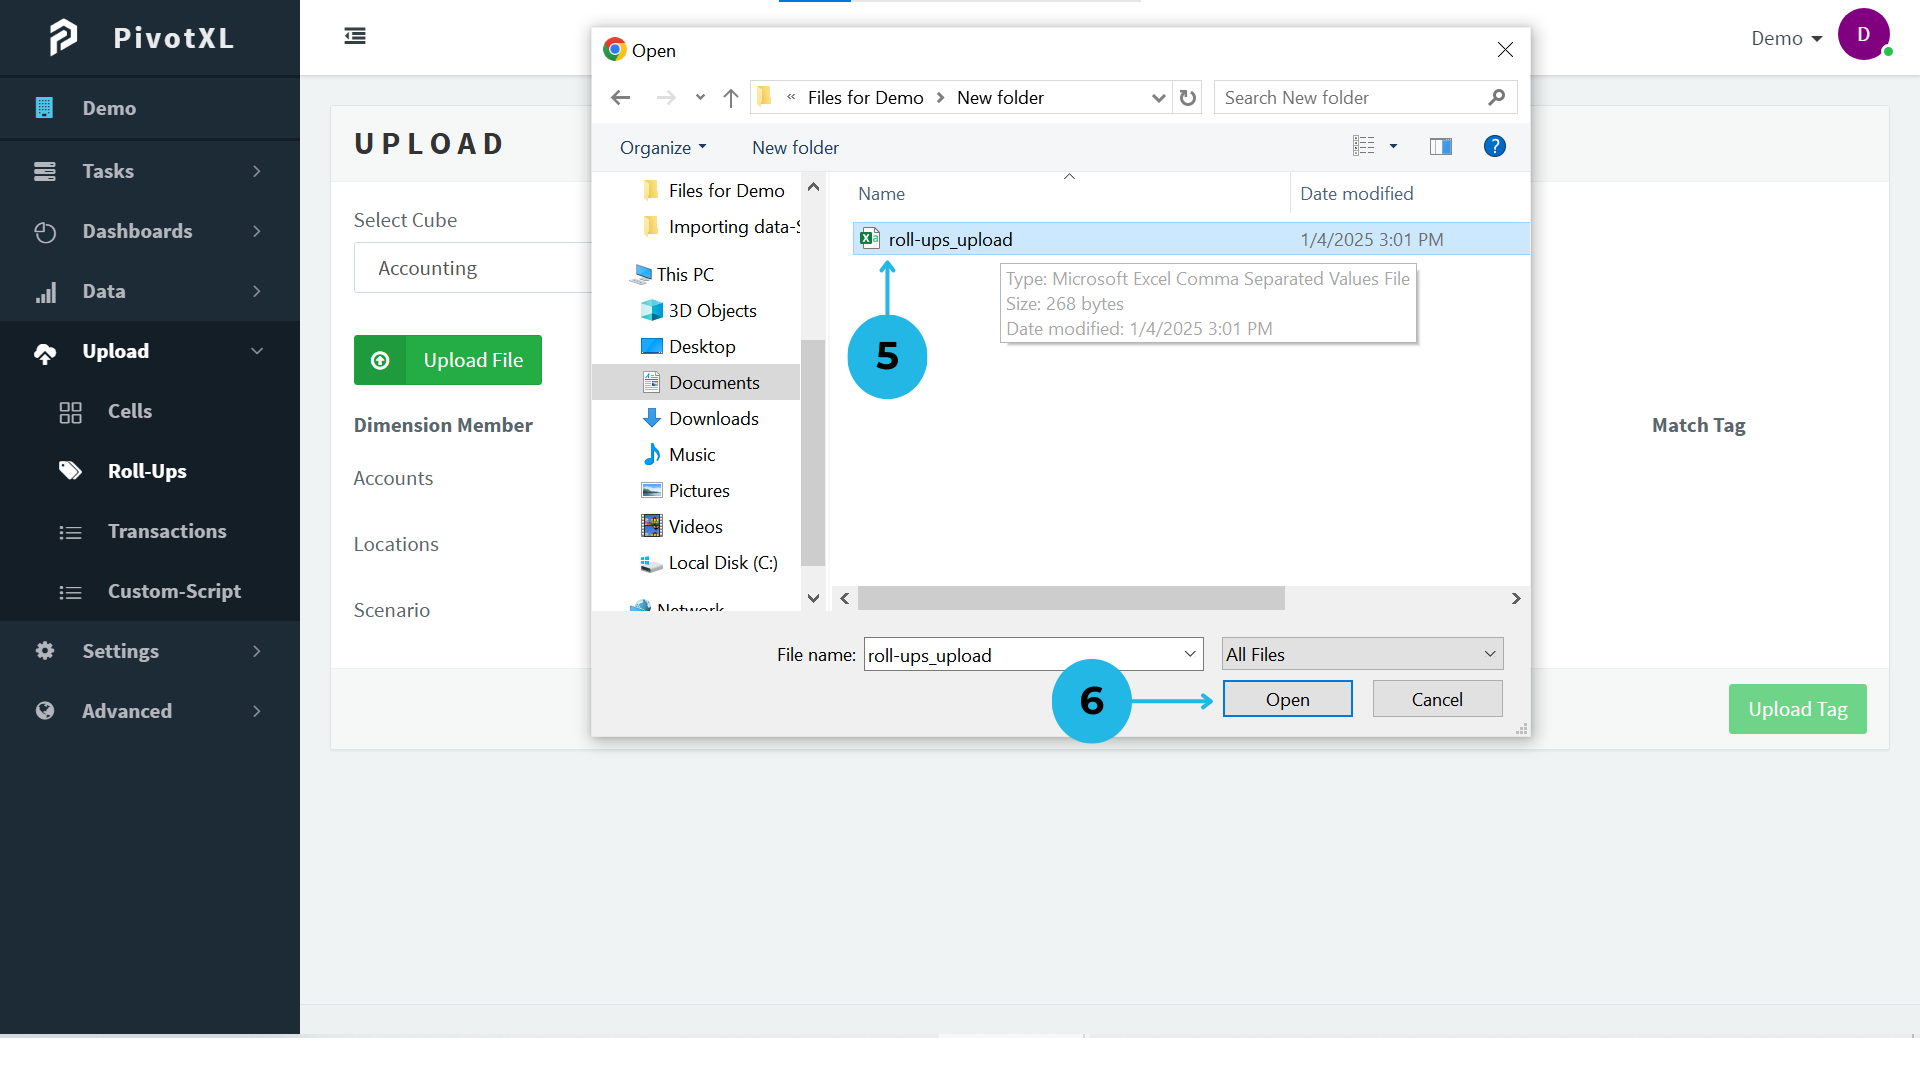
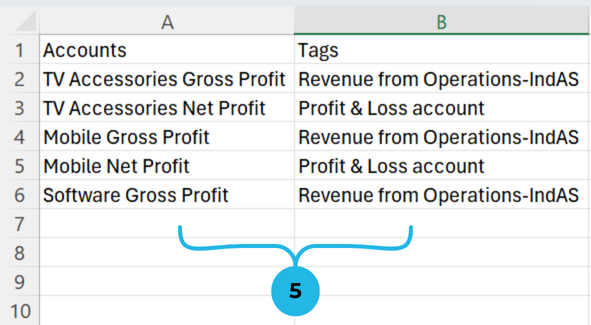
5.Choose a CSV file (the supported format) to ensure compatibility. The file should include ‘Accounts’ as dimension members and ‘Tags’ for tagging them. Use the attached example to structure your file—assign Tags by adding their names in the same row as the corresponding dimension member.
6.After verifying that the correct file is selected, click the Open button to proceed.
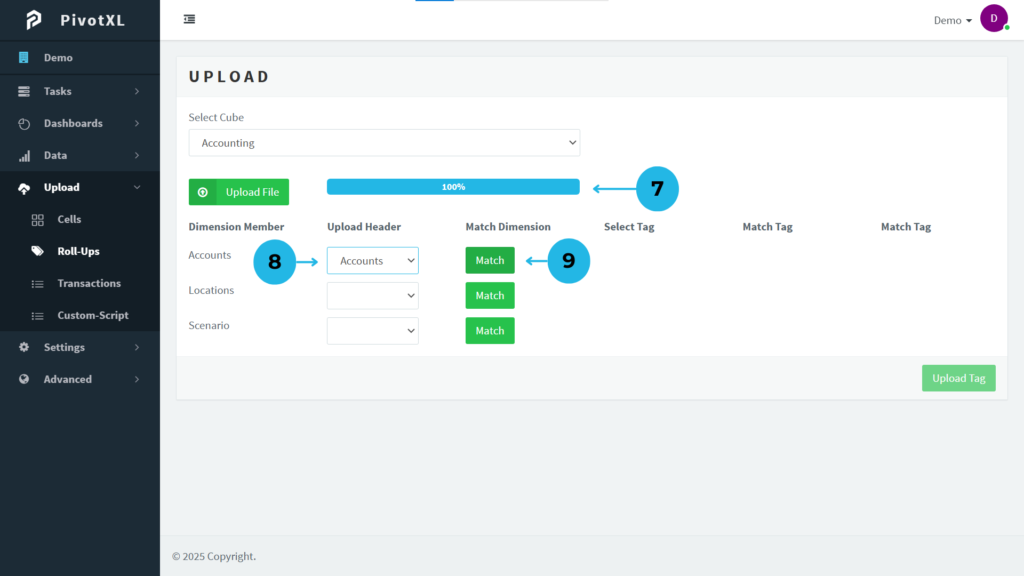
7.Ensure the file upload process reaches 100% to confirm successful data integration.
8.From the uploaded file, select the header name ‘Accounts’ and map it to the Accounts dimension.
9.Use the Match button in the Match Dimension section to align the uploaded data with the dimension members.
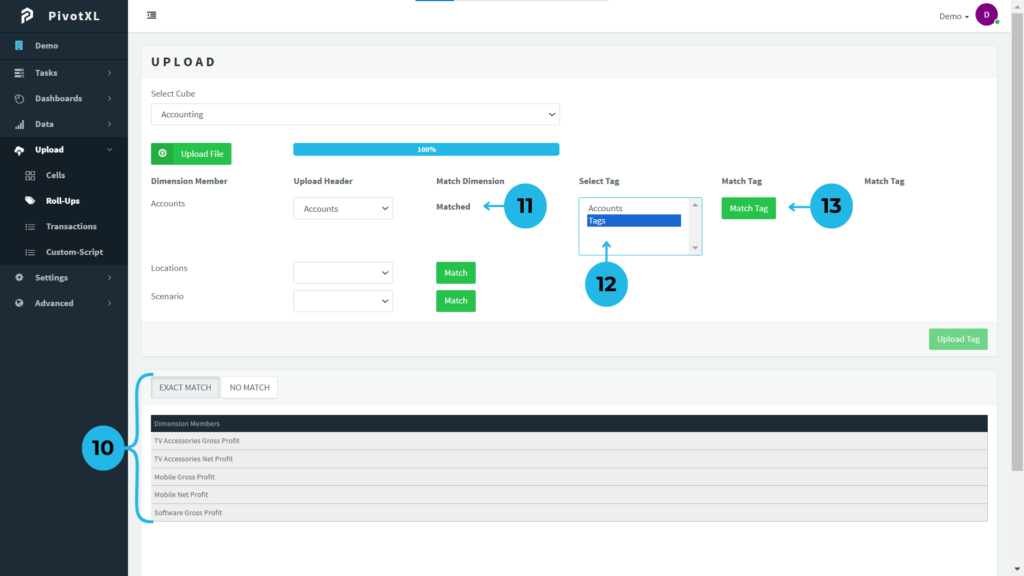
10.Displays a list of exactly matched cube dimension members from the uploaded file. For any No Match members, easily add them to the dimension for seamless integration.

11.Confirms that all dimension members from the file are successfully matched.
12.In the Select Tag section, choose the ‘Tags’ header from the uploaded file.
13.Use the Match Tag button to align the file’s Tags with the dimension Tags for accurate grouping.
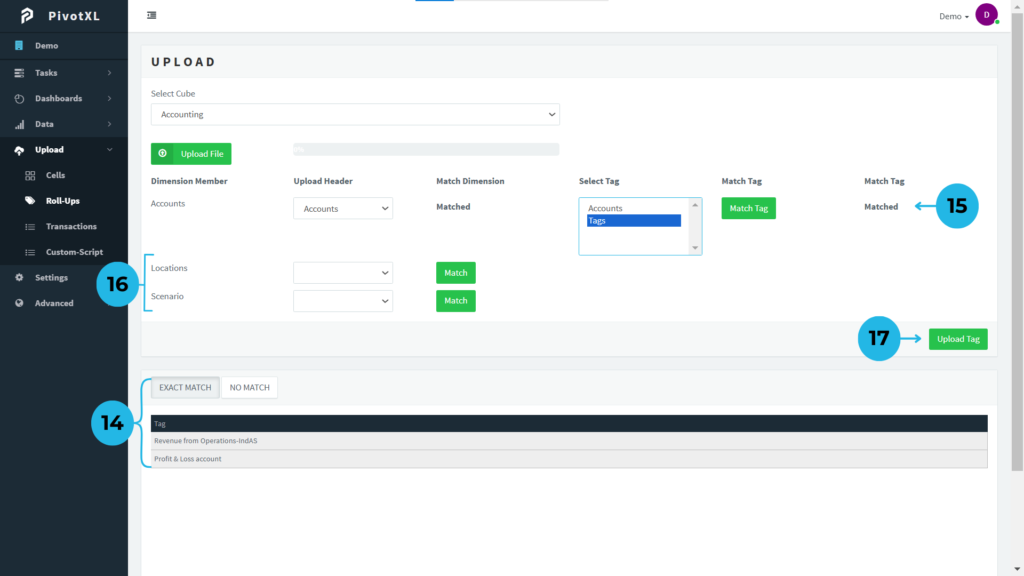
14. Ensures that all Tags from the file are exactly matched with the dimension Tags. For any No Match Tags, easily add new Tags directly to the dimension.
15.Confirms that all dimension Tags from the file are successfully matched.
16.Roll-ups are currently applied to the Accounts Dimension only, so there’s no need to use the Location or Scenario Dimensions. However, this feature supports roll-ups across multiple dimensions using a single file for added flexibility.
17.Verify that all members and Tags in the Roll-ups cube dimension are correctly matched. Once confirmed, click the Upload Tag button to update the cube dimension Tags seamlessly.
Custom Script
The Custom Script feature simplifies the process of importing structured data into the cube. With this tool, you can effortlessly upload your data files, and the script will process them into a format optimized for seamless integration with the cube. This ensures a smooth setup while saving time and effort.

1. Log in to the PivotXL application and navigate to the Upload option from the left-hand menu to initiate the data integration process.
2. Click on Custom-Script to begin uploading data aligned with cubes and dimensions.
3. Choose the Use Case for importing data. The Use Cases are pre-configured on the admin side to match your file structure, ensuring convenient and efficient data uploads. The Custom Script supports all types of data uploads.
4.Click the Upload File button to import your data file into the cube structure, enabling seamless integration. Choose a CSV file (the supported format) to ensure compatibility.
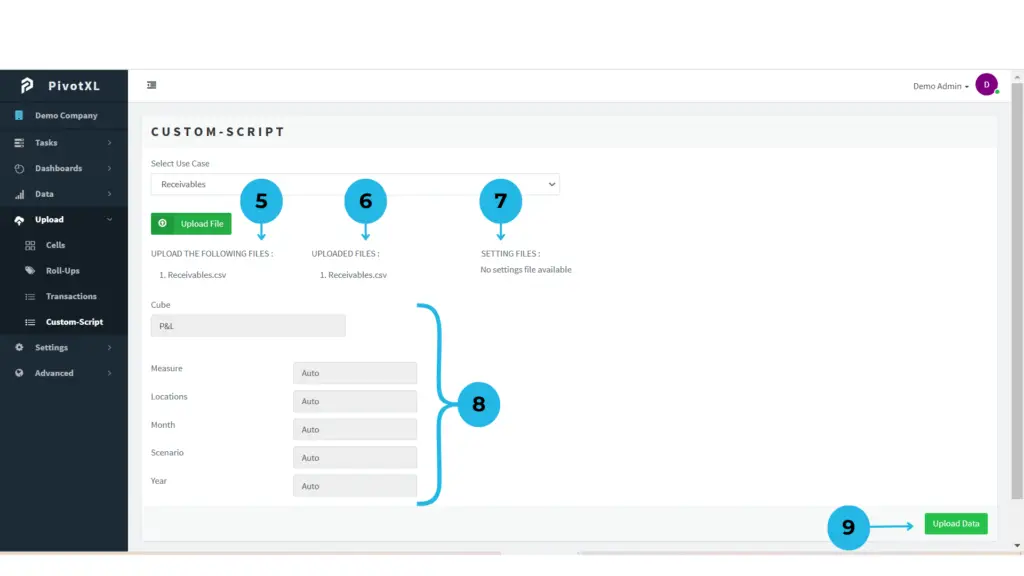
5.The UPLOAD THE FOLLOWING FILES section specifies the required file name format. These formats are pre-configured on the admin side. Ensure your file name matches the specified format, or rename it accordingly. The file must also be in CSV format before uploading.
6.Once the files are uploaded, the UPLOADED FILE section will display the file names and formats. Ensure these match the names listed in the UPLOAD THE FOLLOWING FILES section for proper processing.
7.Save standard reference files in Settings for easy access and seamless integration during script processes.
8.This section is designed to align and process your data into the required structure for seamless integration into the Cube and Dimensions.
9.Double-check all details in the cube dimensions and uploaded files. Once verified, click the Upload Data button to import the data. With the Custom Script, you can efficiently upload complete file data with structured combinations, saving time and effort.

