


Advanced Calculations in PivotXL
In the world of data analysis, efficiency and precision are crucial for extracting meaningful insights. PivotXL custom formulas for dynamic and scalable data calculations enhance users’ ability to process data efficiently. These formulas allow for dynamic and scalable data calculations, ensuring accuracy across multiple datasets.
PivotXL offers two robust methods for implementing custom formulas in dynamic and scalable data calculations: Calculation and Group Calculation. Furthermore, whether you are performing individual computations or automating multiple operations within grouped data, PivotXL custom formulas simplify the process, ensuring efficiency and accuracy.
Understanding PivotXL Custom Formulas
The PivotXL custom formulas for dynamic and scalable data calculations allow users to create advanced computations that adapt to changing datasets. These formulas can be applied to individual cells, entire columns, or grouped data structures, enabling seamless automation.
Calculation: Achieving Precision at the Data Level
What is Calculation in PivotXL?
With Calculation, you can define formulas that generate results for specific data points, seamlessly integrating them into your cubes.
How to Set Up a Calculation in PivotXL
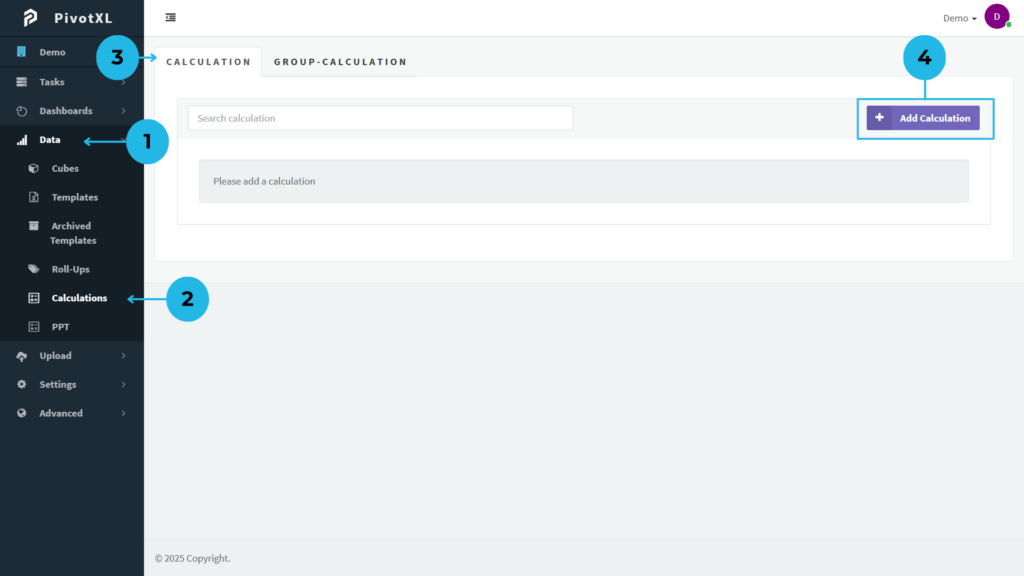
- Open the PivotXL web application, go to the left-side menu, and click on the Data option to access data-related features.
- In the Data sub-menu, click on Calculations to open the calculations page.
- The calculations page will display the message “Please add a calculation” and a button on the right side.
- Click the Add Calculation button to start defining custom formulas and calculations for your data.

- Open the pop-up window and prepare to enter a new calculation by filling in the “Calculation Name” field.
- Once you’ve entered a descriptive calculation name, click the “Add Calculation” button to save it, or hit “Cancel” if you choose not to proceed with the creation.
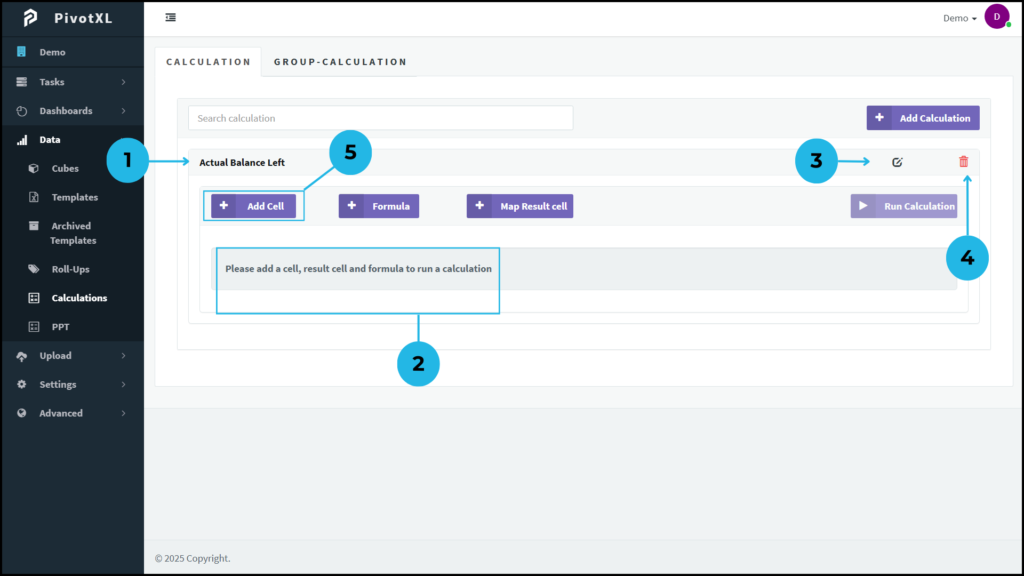
- The calculation appears in the list. Click on its name to display options for making the calculation, such as adding cells, formulas, and cell-result maps.
- If no elements have been added, a message will display indicating that nothing has been added yet.
- To modify the calculation name, click on the edit icon and update the name as needed.
- To delete a calculation, click the delete icon. This will permanently remove the calculation from the list.
- Begin by adding cells for your calculation. Click the button to add a cell and start building your calculation.
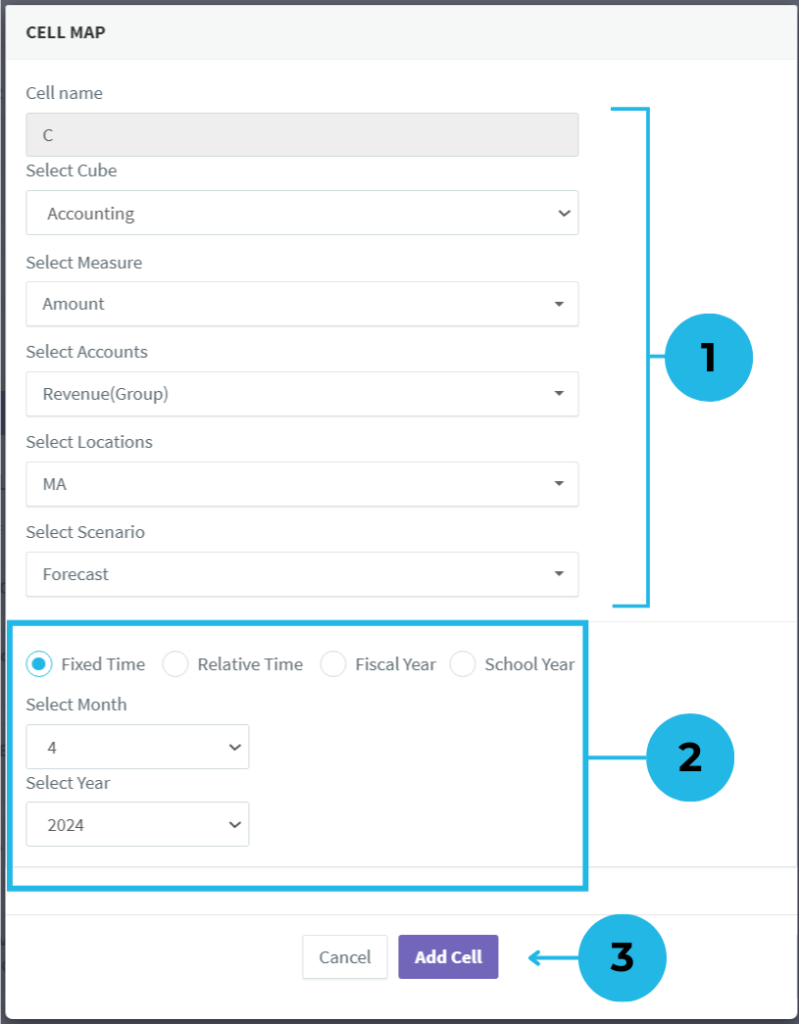
Mapping Data to a Calculation
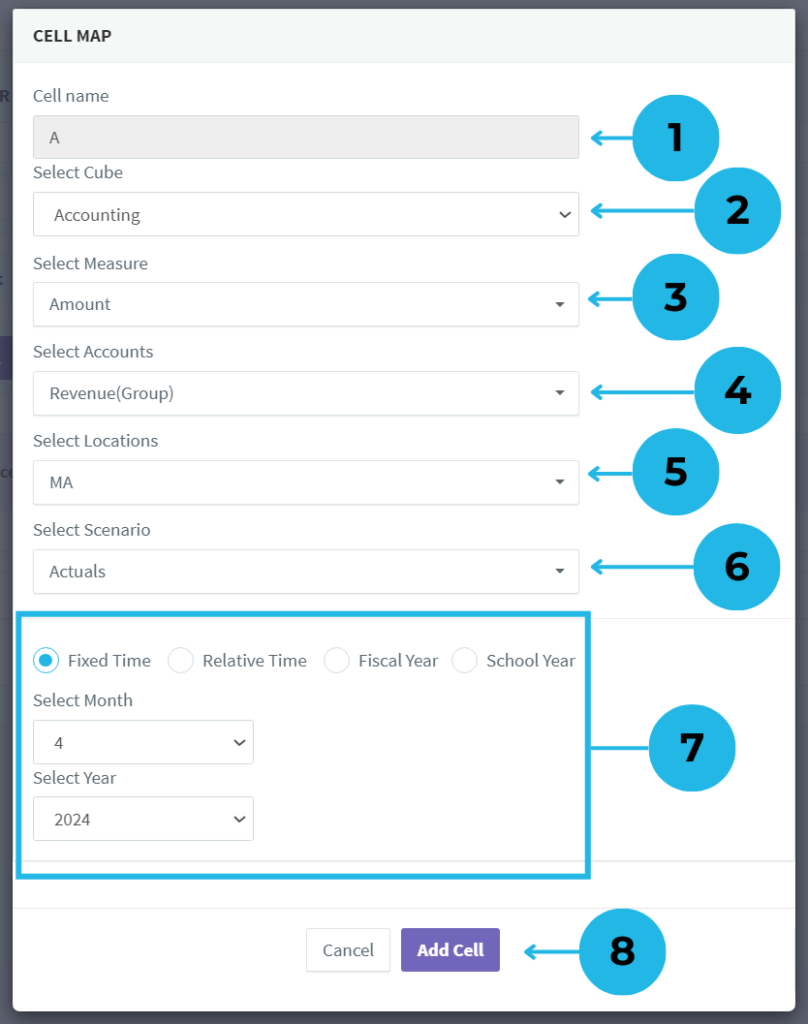
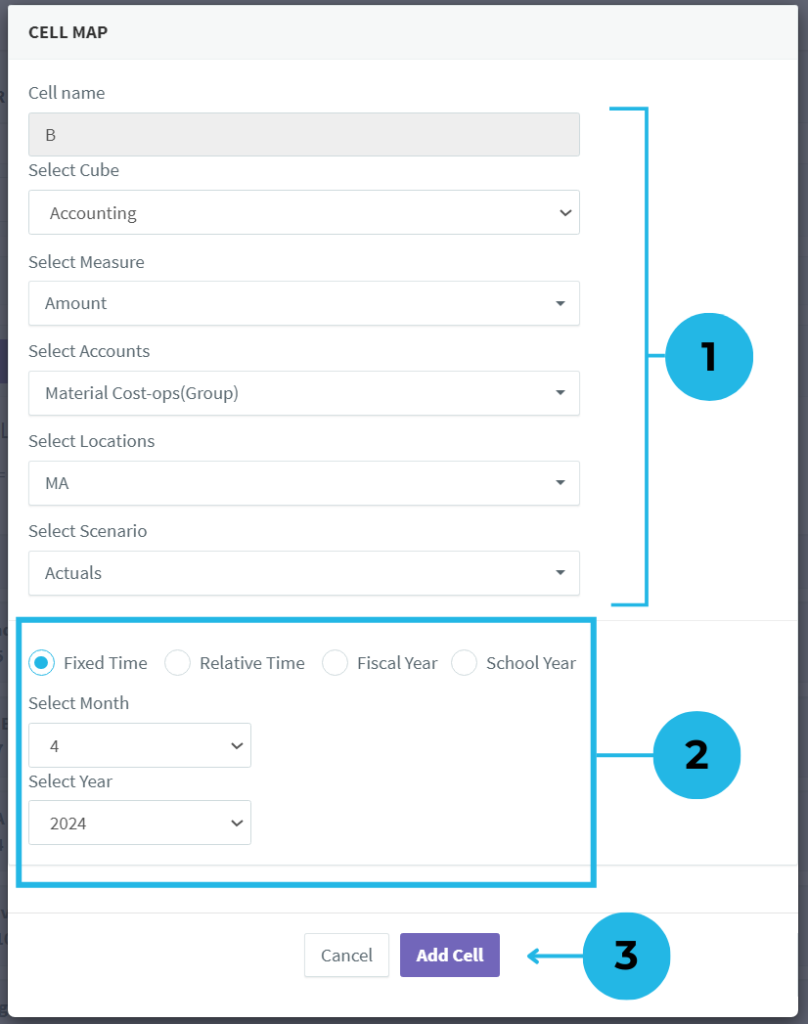
- Each cell name is automatically generated using English alphabets, making it easier to organize and identify cells.
- Choose the cube needed for your calculation, and the system will fetch the relevant dimension details based on your selection.
- Select a dimension member to map the cube combination to this cell. For example, in the “Measure” dimension, you might choose the “Amount” member.
- Similarly, select a member from another dimension, such as “Accounts,” and choose a member like “Revenue (Group)” to map the combination.
- Continue mapping other dimensions, such as “Locations” with the member “MA,” to refine your cube combination in the cell.
- Choose a member from the “Scenario” dimension, such as “Actuals,” to complete the mapping of the cube combination for the cell.
- Select the Time Type for your map combination, and choose between options like Fixed Time, Relative Time, Fiscal Year, or School Year. Also, select the appropriate Month and Year.
- Review the map configuration details to ensure accuracy. To complete the mapping, click the “Add Cell” button to save the combination in the cell.
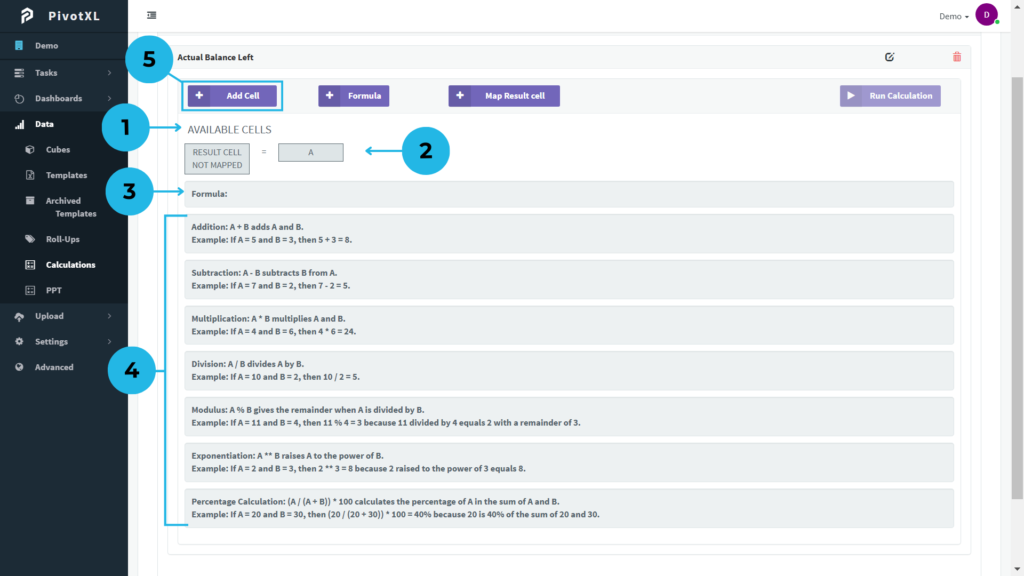
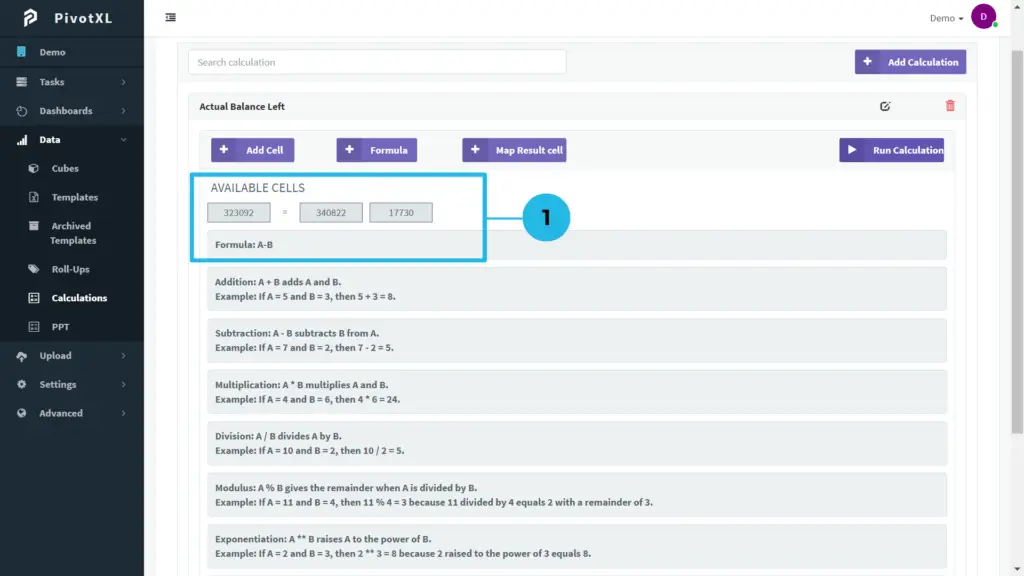
- The available cell details for the calculation are displayed, providing a comprehensive overview of the cells involved.
- The created cell “A” will appear in the available cells list. Click on the cell to view or modify its mappings as needed.
- The formula associated with the calculation is displayed here. Once created, the formula will appear for easy reference.
- An easy-to-use reference guide is available to help you navigate and understand the calculation process.
- You can add multiple cells to your calculation by clicking the button. Create as many cells as needed for your calculation.
Mapping Data to a Calculation
- The cell map pop-up opens, with the cell name automatically generated. Select the cube and all relevant dimension members to map the cell.
- Select the preferred Time Type for your map combination to ensure accurate mapping of the cell.
- Review the mapping details and click the “Add Cell” button to save the mapping within this cell.

- The newly created cell “B” appears next to cell “A” in the available cells list. Click on it to view or modify its mappings.
- Click the button to add a formula, which will open a new pop-up for configuration.
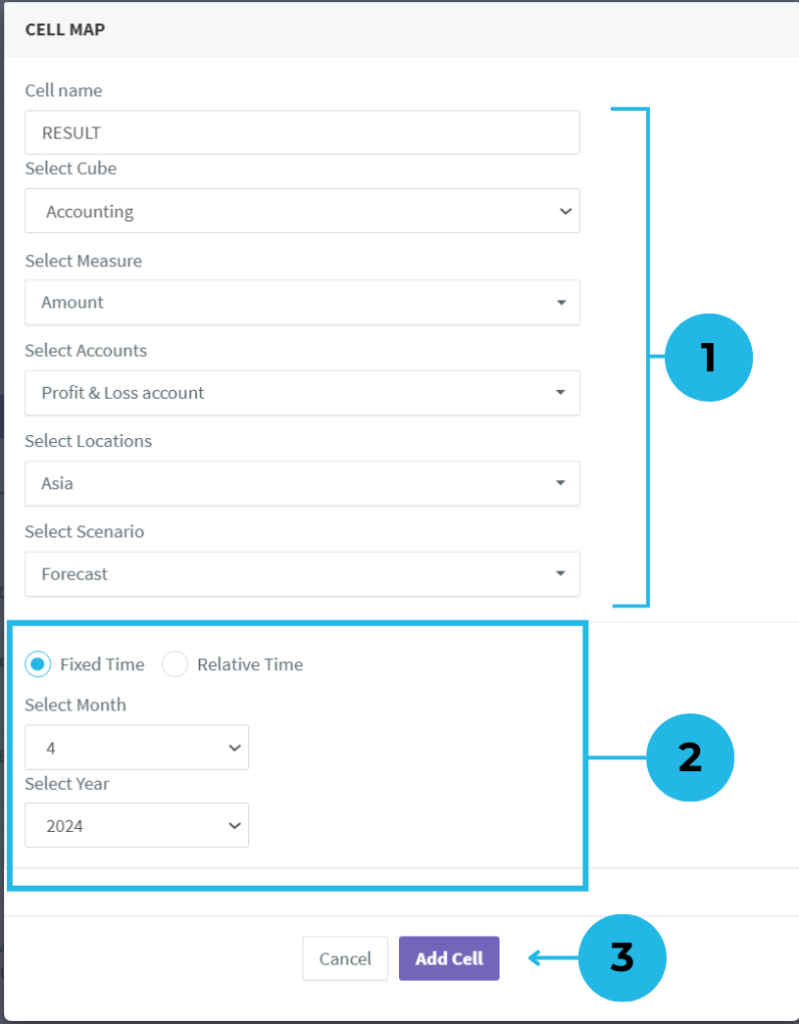
- This cell is designed to store the calculation result. A message will indicate if the cell has not been mapped yet.
- To map the result cell, click the button to proceed. A new pop-up will appear for configuring the result mapping.
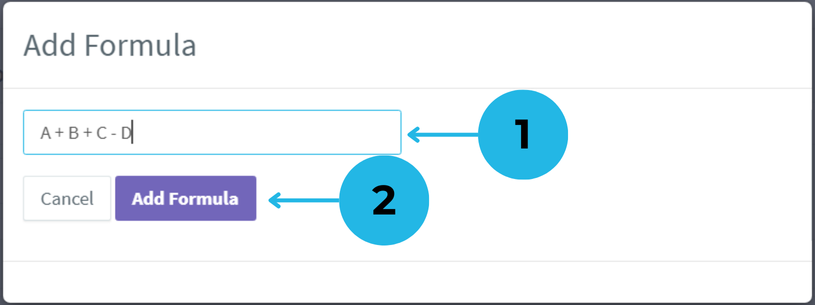
Creating and Applying Formulas

- The pop-up allows you to input a formula for the calculation. Use operators to define relationships between cells. Refer to the guide for structuring the formula correctly.
- Verify the formula details and click the “Add Formula” button to save it.
Mapping Data to a Calculation
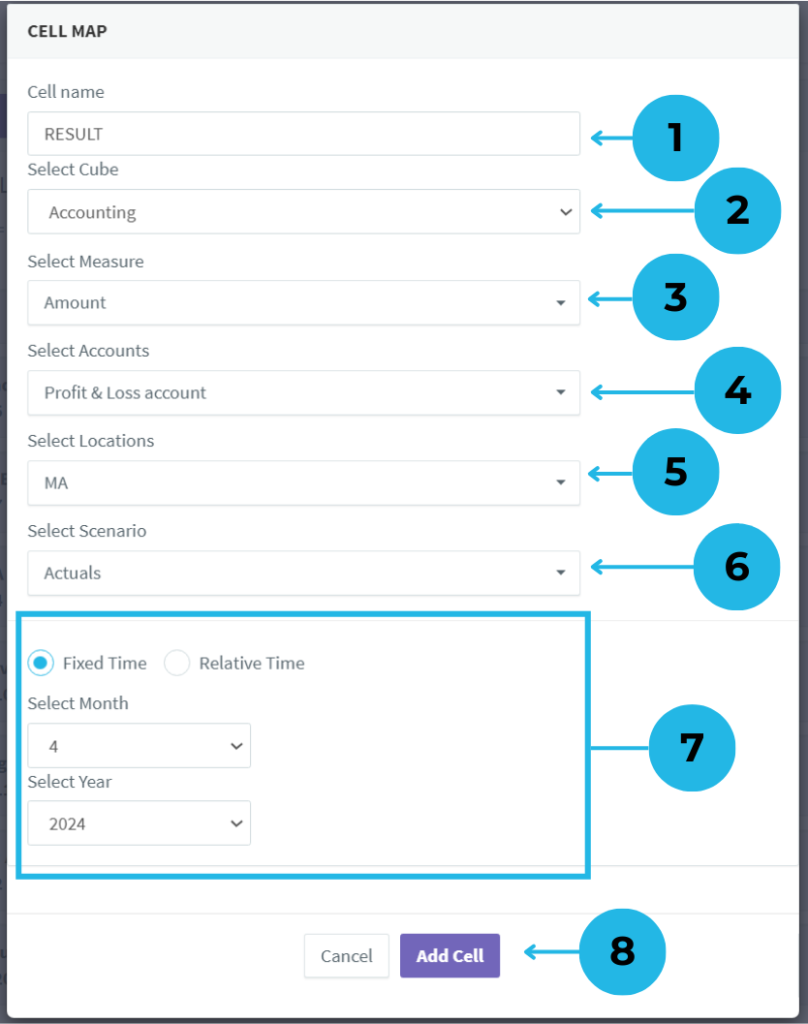
- The result cell is automatically named “RESULT”, making it easy to identify and locate the calculation outcome.
- Choose the cube where the calculation will be stored. The system will retrieve relevant dimension details based on your selection.
- Select a dimension member to link the cube combination to the result cell. For example, in the “Measure” dimension, choose the “Amount” member.
- Select a member from another dimension, such as “Accounts,” and map it to a relevant member like “Profit & Loss Accounts” in the result cell.
- Continue refining the mapping by selecting dimensions like “Locations” and choosing a member such as “MA.”
- Choose a member from the “Scenario” dimension, such as “Actuals,” to finalize the cube combination mapping.
- Choose the appropriate Time Type (e.g., Fixed Time or Relative Time) and specify the Month and Year for the mapping.
- Verify the mapping details for accuracy. Click the “Add Cell” button to save the mapped combination in the result cell.

- The newly created formula is displayed in the formula description for easy reference.
- The message updates to “RESULT”, indicating that the calculation is ready.
- Click to execute the calculation. It processes based on the defined formula between the cells.
- Cells display calculated values, with the corresponding formula shown beneath them for easy reference. Click on a cell value to view its mapping details.
Multiple Calculations: Managing Complex Computations
For large-scale data computations, PivotXL enables users to create multiple calculations within a single workspace.
Steps to Add Multiple Calculations
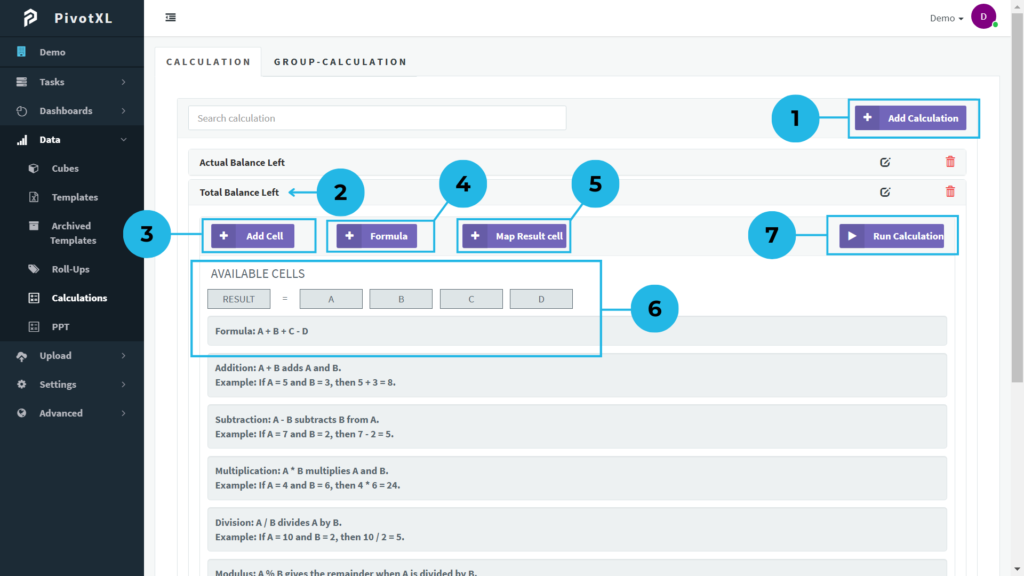
1.Click the button to create and add a new calculation.
2.The newly created calculation appears below the previous one. Click its name to access options for configuration. Edit the name using the right-side edit icon or delete the calculation by clicking the delete icon, which prompts a confirmation pop-up.
Mapping Data to a Calculation


- Each cell name is automatically generated using English alphabets when a new cell is added to a calculation. Select the cube and relevant dimension members to map each cell.
- Select the preferred Time Type to ensure accurate mapping for each cell.
- Verify the mapping details and click the “Add Cell” button to save the configuration for each cell.
3.Click the button to add cells. A total of four cells (A, B, C, D) need to be created for the calculation.
4.Click the button to define and add a formula for the calculation.
Creating and Applying Formulas
- The pop-up allows you to input a formula for the calculation. Use operators to define relationships between cells. Refer to the guide in the Available Cells section for the proper formula structure. You can apply formulas to the required cells, e.g., A + C or D – A.
- Verify the formula details and click the “Add Formula” button to save it.
5.Click the button to map the result value and store it in the result cell based on the preferred combination.
- The result cell is automatically named “RESULT”, making it easy to identify and locate the calculation outcome. Select the cube and relevant dimension members to map the result cell.
- Select the preferred Time Type to ensure accurate mapping for the result cell.
- Verify the mapping details and click the “Add Cell” button to save the configuration for the result cell.
6.The available cells “A,” “B,” “C,” “D” are displayed in the available cells section. The created formula is also shown for reference.
7.Verify the cell mapping details and click the “Run Calculation” button. The results will be updated in the result cell within the cube combination.

1.The cell values are updated, and the result cell stores the calculated value based on the formula.
Group Calculation: Automating Batch Processing for Efficiency
What is Group Calculation?
Group-Calculation simplifies large-scale computations by organizing multiple calculations into structured groups. Users can create groups, add existing calculations, and execute them efficiently in a single step. This approach enhances productivity by eliminating repetitive manual operations and ensuring consistency across multiple data points.
Setting Up a Group Calculation in PivotXL
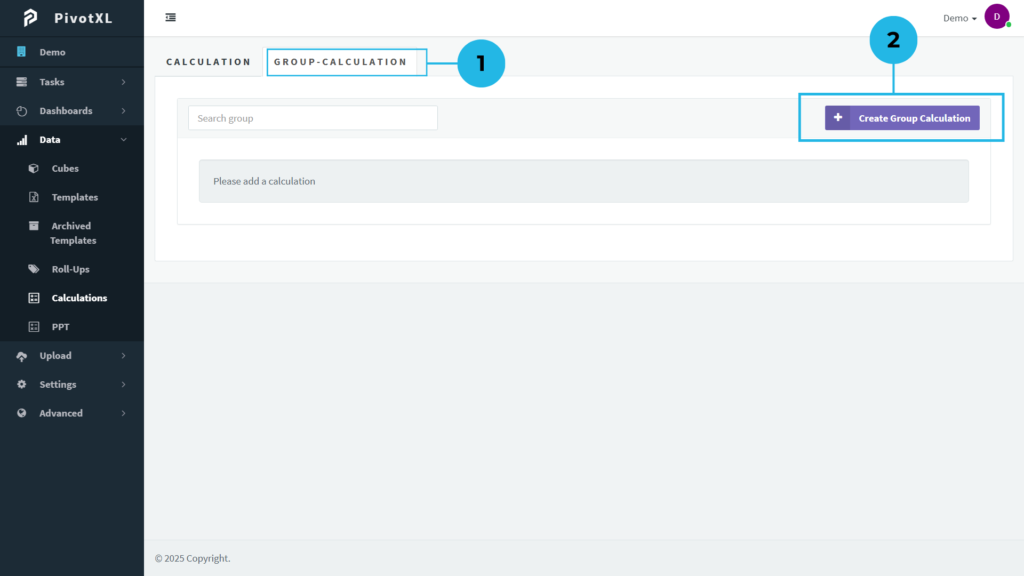
- In PivotXL, go to the Data menu and select the Calculation submenu. Click the Tab Group-Calculation. If no group calculation has been created, an empty message will appear: “Please add a calculation.”
- Click the button to add a group calculation, opening a new pop-up window.
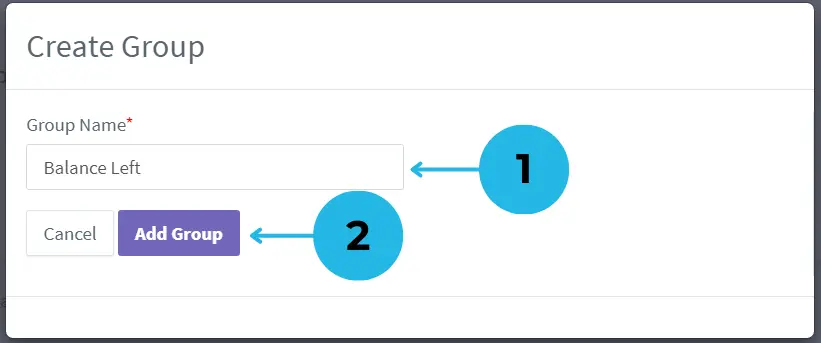
- In the pop-up, enter the name of the group calculation.
- Click the button to add the group calculation. If you don’t want to create it, click the Cancel button.
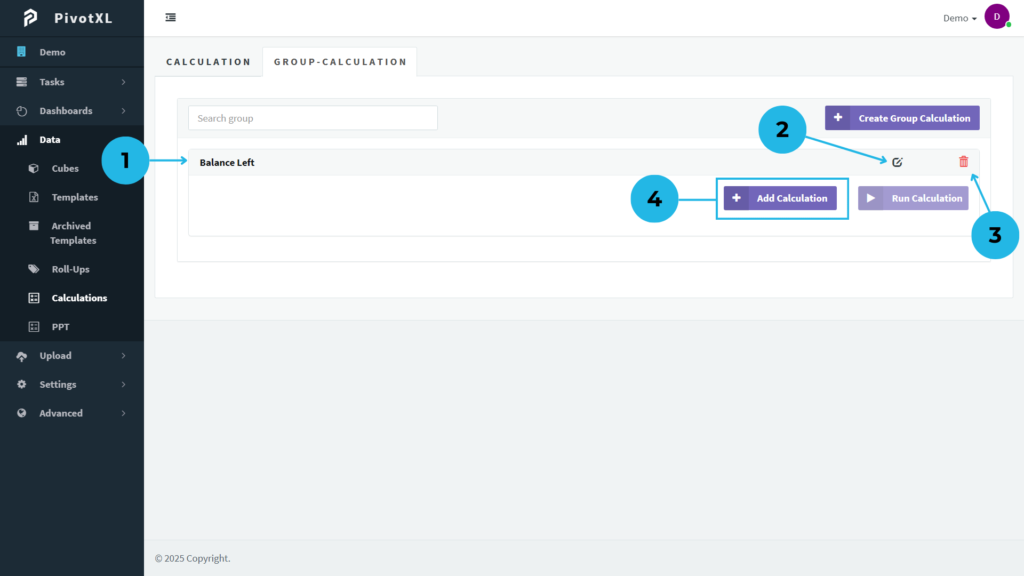
- Once created, the group calculation appears. Click its name to access options below, including two buttons.
- To change the name of the group calculation, click the edit icon.
- To delete the group calculation, click the delete icon. A confirmation pop-up will appear.
- Click the button to add existing calculations to the group.
Adding Calculations to a Group
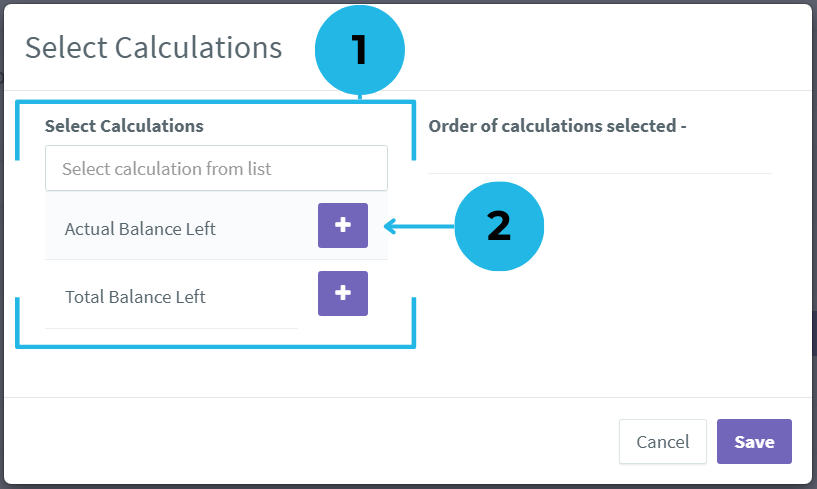
- A new pop-up appears with a list of existing calculations.
- Click the plus icon next to the desired calculation. Use the search bar to easily find specific calculations.
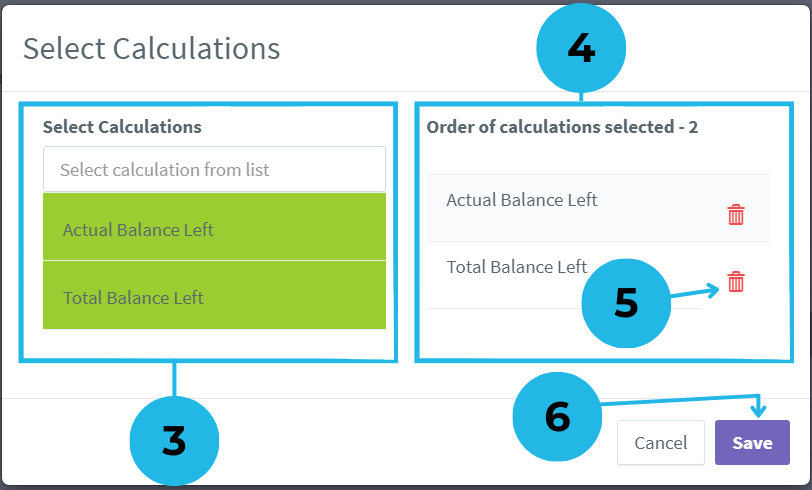
- Once a calculation is selected, its color changes to green, indicating it’s selected.
- The section shows a list of selected calculations, including a count of how many have been added.
- To unselect a calculation, click the delete icon next to it, removing it from the list.
- Review the added calculations and click the Save button to update the group with the selected calculations.
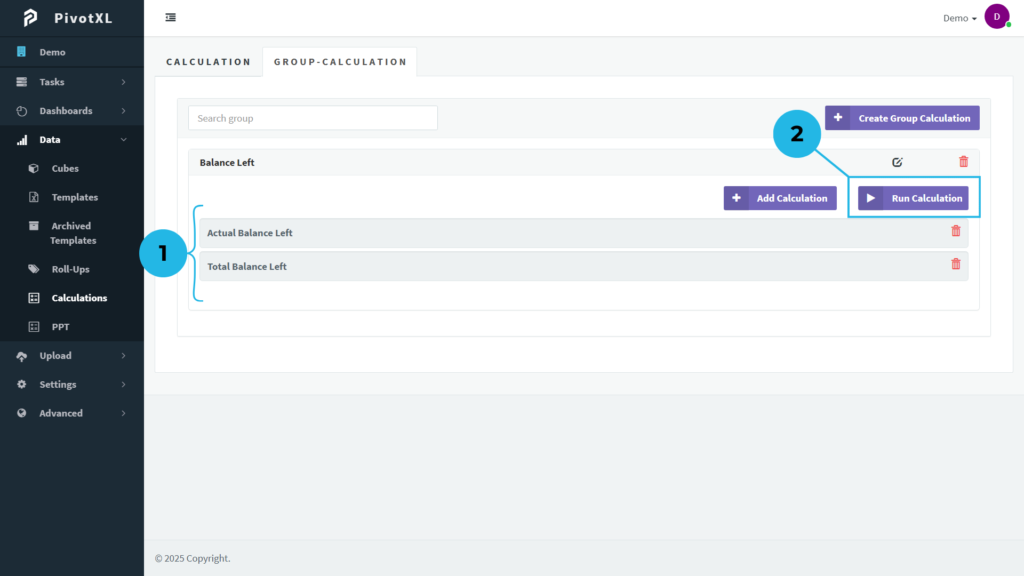
- The added calculations will be displayed in the group. They are view-only, but can easily be deleted using the delete icon next to each calculation.
- To execute the group calculation, click the Run button. Each calculation will update the result in the mapped cube combination within the group.
Benefits of Using PivotXL for Data Calculations
1. Improved Accuracy & Precision
By mapping dimensions and time types accurately, PivotXL minimizes errors and ensures reliable results.
2. Streamlined Workflow & Efficiency
Group calculations eliminate redundant manual work, enabling faster processing of large datasets.
3. Scalable Data Management
Users can handle multiple calculations and batch processing without complexity, making PivotXL ideal for businesses dealing with vast amounts of data.
Final Thoughts
PivotXL empowers data analysts with powerful calculation tools that enhance precision and automate large-scale computations. Whether working with individual calculations or batch processing with group calculations, PivotXL provides an efficient solution for data-driven decision-making.
By following the structured approach outlined above, users can optimize their data calculations, improve accuracy, and save time—ensuring seamless and efficient data analysis.

