


Microsoft Excel is widely used for data entry, analysis, and reporting. While it offers powerful features, one essential tool that users often overlook is the Spell Check function. Unlike Word, Excel does not underline misspelled words automatically. Therefore, it is crucial to run a spell check manually. In this guide, we’ll show you how to perform spell check in Excel step by step.
Why Use Spell Check in Excel?
Using spell check in Excel is highly beneficial because it ensures your spreadsheets remain professional and error-free. More specifically, it helps:
- Identify and correct spelling mistakes, thus improving accuracy.
- Maintain accuracy in reports and presentations, making them more reliable.
- Enhance readability and credibility, which is essential for professional documents.
“Learn how to move columns in Excel with this detailed guide. Click here to explore more.”
How to Perform Spell Check in Excel
Open Your Excel File
First of all, launch Microsoft Excel and open the spreadsheet where you want to check for spelling errors.
Open the Spell Check Tool
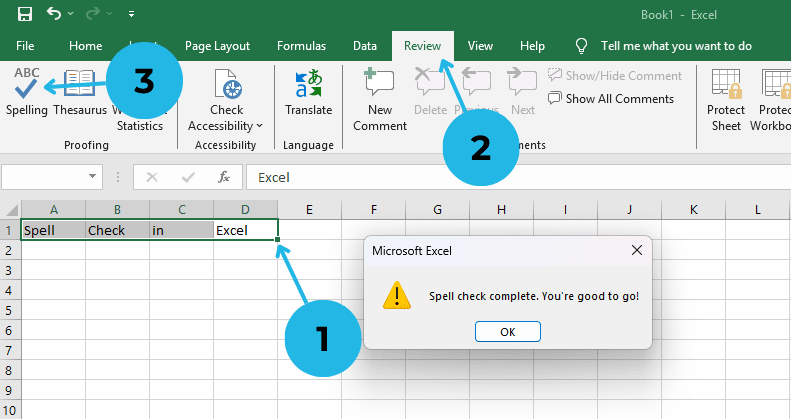
- Select the Area to check and You can press F7 on your keyboard.
- Alternatively, you can go to the Review tab on the ribbon
- Then click on Spelling.
Review and Correct Mistakes
- Excel will highlight misspelled words while also suggesting corrections.
- At this point, you can choose to Change, Ignore, or Add to Dictionary, depending on your preference.
- If the spell check is complete with no errors, Excel will display a message: “Spell check complete. You’re good to go!”
Save Your Changes
After making all necessary corrections, don’t forget to save your Excel file to ensure all updates are retained.
Additional Tips for Spell Checking in Excel
- Enable AutoCorrect: In addition to spell check, you can set up AutoCorrect to fix common mistakes automatically. To do this, go to File > Options > Proofing > AutoCorrect Options.
- Use Find & Replace: If you frequently misspell certain words, you can use Ctrl + H to replace them quickly and efficiently.
- Check Multiple Sheets: Keep in mind that Excel only checks the active worksheet. Therefore, you must run spell check separately for each sheet if needed.
Conclusion
In conclusion, using spell check in Excel is a simple yet essential step in ensuring accuracy and professionalism in your spreadsheets. By following the outlined steps, you can quickly identify and correct spelling mistakes, making your data presentations, reports, and analyses much more polished and error-free. Furthermore, taking advantage of additional tools like AutoCorrect and Find & Replace can save you time and effort in the long run. More importantly, whether you’re working on financial reports, academic research, or business presentations, a well-checked document enhances credibility and readability.
Thus, don’t forget to use spell check in Excel to maintain the highest level of accuracy in your work. Moreover, by consistently checking your spelling, you can improve the overall quality of your spreadsheets. Try it out today and experience the benefits firsthand!
“Discover more about how to use Spell Check in Excel from trusted sources.”

