


For More Finance How To Videos
Check out our youtube playlist
Introduction:
Checkbox in Excel can make your spreadsheets more interactive and organized. Whether you want to create a to-do list, track completed tasks, or build an interactive dashboard, checkboxes provide a simple yet powerful feature. In this beginner-friendly guide, we’ll walk you through the process of inserting and using checkboxes in Excel step by step, ensuring that you can easily follow along.
Why Use Checkbox in Excel?
Checkboxes offer several benefits, making your spreadsheet more functional and user-friendly. Specifically, they are great for:
- Creating interactive to-do lists to keep tasks organized and track completion effortlessly.
- Tracking progress in projects, helping you monitor milestones and deadlines with ease.
- Managing attendance or inventory, providing a simple way to mark present or available items.
- Enhancing data visualization in dashboards, ensuring a clear and structured representation of information.
With these advantages in mind, let’s move on to the step-by-step instructions for adding checkboxes in Excel.
Step 1: Enable the Developer Tab
Before you can start inserting checkboxes, you’ll need to enable the Developer tab in Excel. Follow these simple steps to get started:
- Open Excel and click on File to access the menu.
- Next, select Options from the list.
- In the Excel Options window, click on Customize Ribbon to modify the toolbar settings.
- Then, under the Main Tabs section, check the box next to Developer to enable it.
- Finally, click OK to apply the changes and close the window.
Once you’ve completed these steps, you’ll notice that the Developer tab has appeared in the ribbon, meaning you’re now ready to insert checkboxes!
For a more detailed guide on customizing Excel, visit our article on Excel Customization.
Step 2: Insert a Checkbox in Excel
To add a checkbox in Excel, follow these simple steps:
- First, navigate to the Developer tab at the top of your screen.
- Then, locate the Controls group and click on Insert.
- Under the Form Controls section, select the Checkbox option.
- After that, click anywhere in your worksheet where you’d like to place the checkbox.
- Finally, adjust the size or position of the checkbox as needed to ensure it fits neatly into your spreadsheet layout.
At this point, you have successfully inserted a checkbox into your Excel sheet!
Step 3: Link the Checkbox to a Cell
To ensure your checkbox is functional and interacts with your data properly, you need to link it to a specific cell. Follow these steps:
- First, right-click on the checkbox and choose Format Control from the menu.
- When the Format Control dialog box appears, navigate to the Control tab.
- Next, click inside the Cell Link field, then select the cell where you want the checkbox’s status to be recorded (e.g., B2).
- Finally, click OK to confirm the selection.
Now, whenever you check or uncheck the box, the linked cell will automatically display TRUE (checked) or FALSE (unchecked). This makes it easier to track selections and use the checkbox data in formulas or analysis.
Step 4: Use Checkbox in a To-Do List
To help you apply what you’ve learned, let’s walk through creating a simple to-do list using checkboxes step by step:
- First, type out your task list in Column A (e.g., A2:A6) so you have a clear structure.
- Next, insert checkboxes in Column B (B2:B6) right next to each corresponding task.
- Then, link each checkbox to its respective cell in Column C (C2:C6), so Excel can record whether a task is marked as complete.
- Finally, use the formula
=COUNTIF(C2:C6, TRUE)to calculate how many tasks have been completed.
By following these steps, you’ll have a dynamic to-do list that updates automatically, allowing you to track your progress in real time with ease!
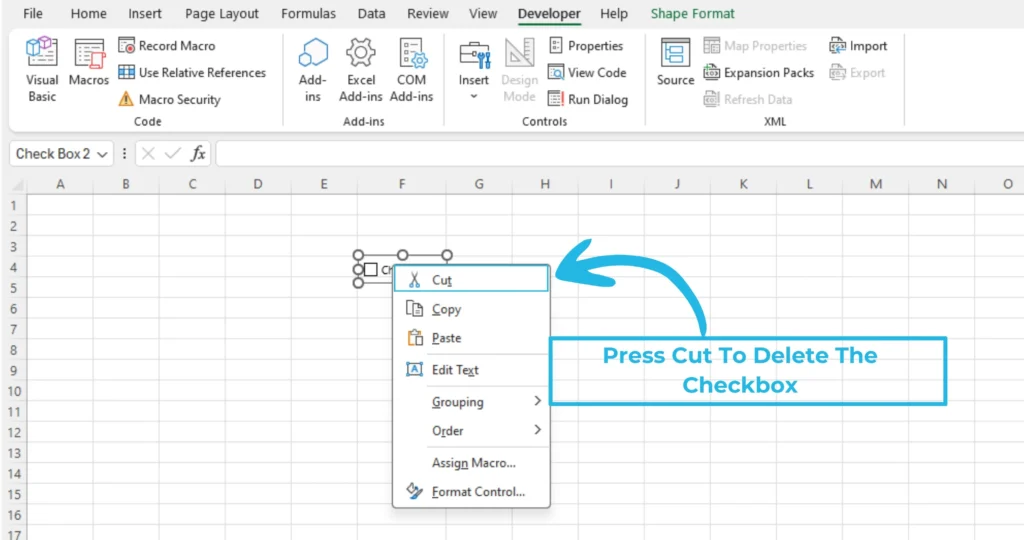
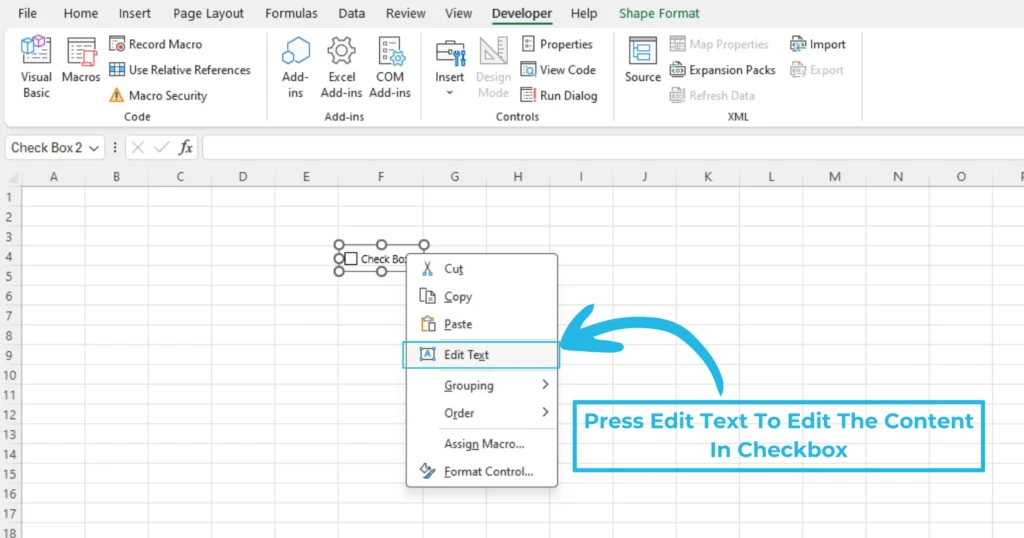
Step 5: Remove or Edit Checkbox in Excel
To remove a checkbox:
- Click on the checkbox and press Cut.
To edit a checkbox label:
- Right-click on the checkbox and select Edit Text.
Conclusion:
Using checkboxes in Excel is an excellent way to enhance interactivity and improve data tracking. Whether you’re managing a to-do list, tracking project progress, or building a dashboard, checkboxes provide an intuitive way to work with your data. Try it out today and see how it simplifies your workflow!
Do you use checkboxes in Excel? Share your experience in the comments below!
For more beginner-friendly Excel tutorials, explore our PivotXL Blog.
