


PivotXL provides a powerful Task Management feature designed to streamline budgeting activities and automate the month-end close process, empowering teams to collaborate seamlessly.
Admin View: The Command Center for Task Creation
The Admin View offers a comprehensive platform for creating and managing financial reporting tasks. Administrators can create new tasks, assign roles such as Assignees and Approvers, and efficiently manage task workflows.
Key features include task editing, cloning for recurring activities, and archiving completed tasks for future reference. Additionally, smart filtering options help you quickly locate specific tasks, ensuring seamless task coordination and timely financial reporting.
Creating a New Task in PivotXL
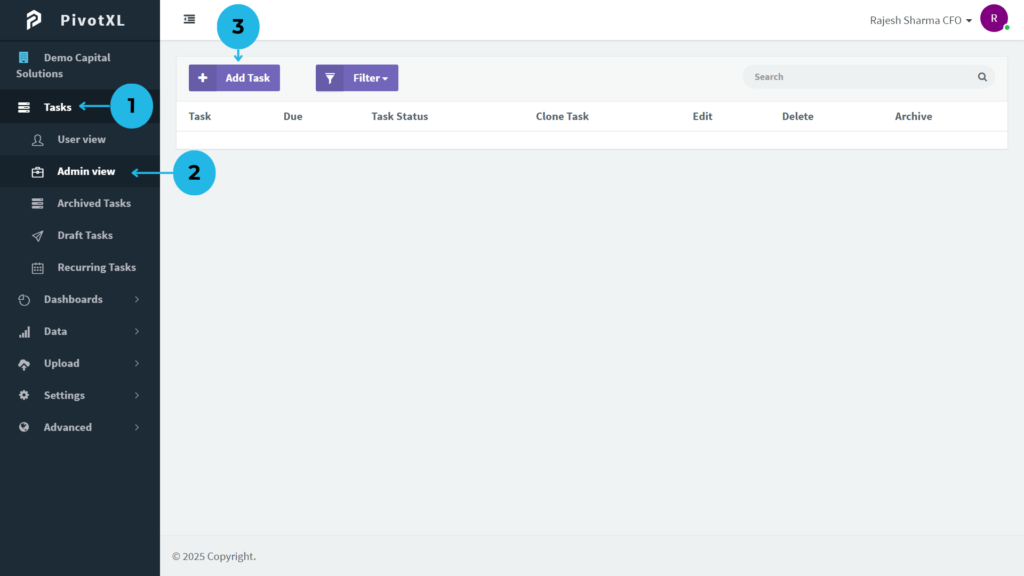
1.Log in to your PivotXL account and navigate to the left menu. Click on Task to access task management options.
2.Select the Admin View option to begin task creation.
3.You can create a new task by clicking the Add Task button.
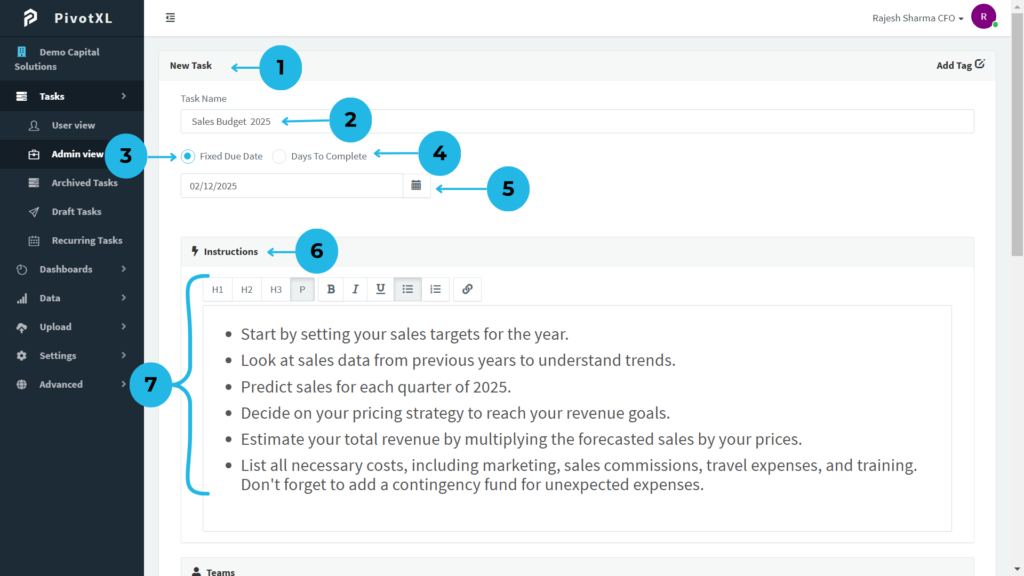
1.A new pop-up will open, labeled New Task, for task setup.
2.Provide the task name in the Task Name section.
3.Enable the Fixed Due Date checkbox to set a specific deadline. Selecting this option will display a calendar icon for date selection.
4.Alternatively, use the Days to Complete checkbox to enter the required number of days for task completion.
5.Click the calendar icon to choose a specific due date if using the Fixed Due Date option.
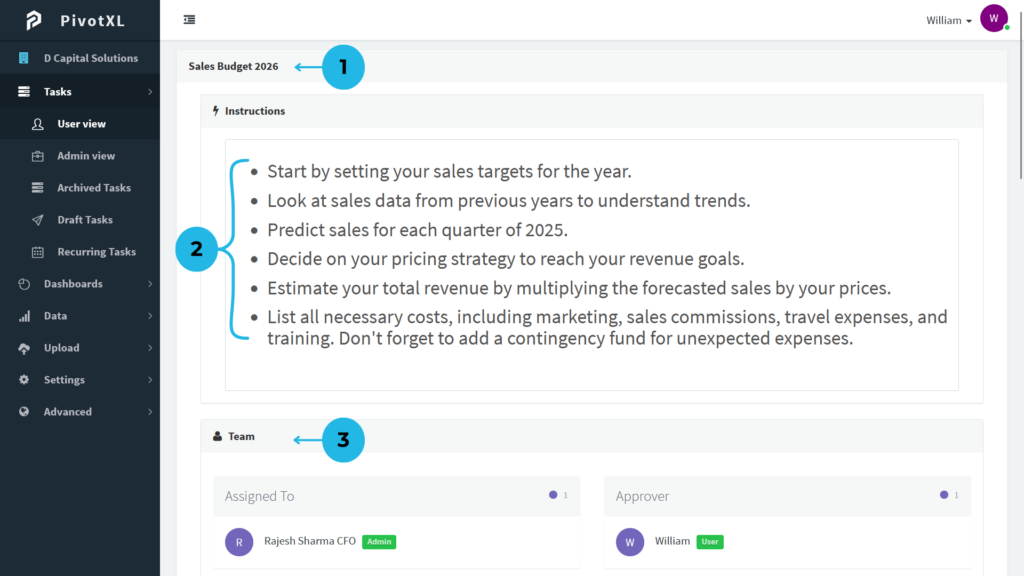
6.Use the Instructions section to provide task-related guidelines.
7.The instruction editor provides multiple tools to enhance task instructions. You can highlight text for emphasis, add numbered lists or bullet points for better organization, and attach external links to provide additional resources.
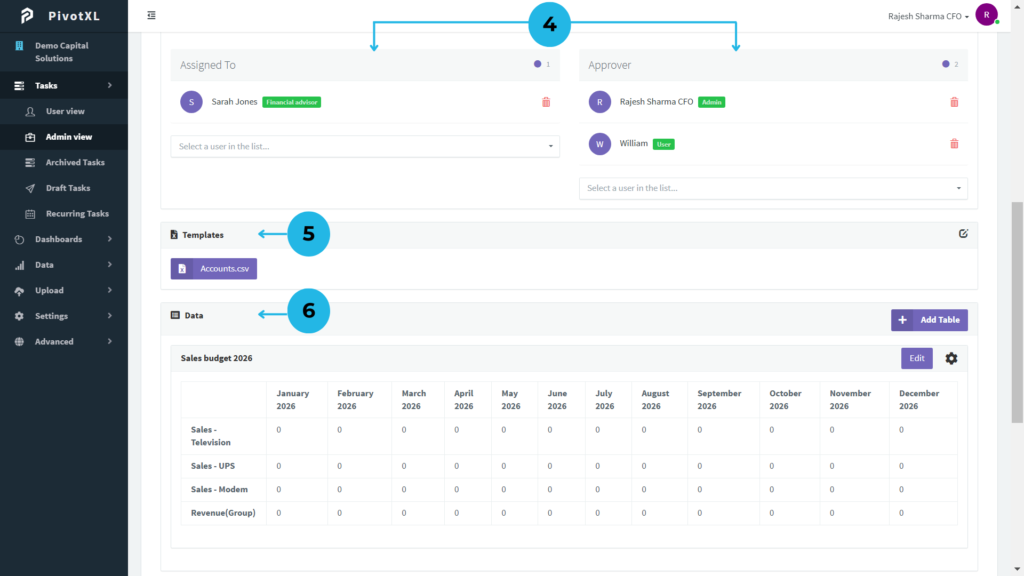
8.Navigate to the Team Section to manage task roles. Assign users as Assignees or Approvers for the task.
9.In the Assigned To Tab, select or modify users for task completion. The tab shows a count of assigned users.
10.Click on the User Selection Dropdown to assign the task to a user.
11.The User List displays selected assignees for task completion, showing each user’s name and role along with a Remove Option.
12.Click the Delete Icon to remove the user from the task, whether they are an Assignee or Approver.
13.Similarly, use the Approver Tab to select approvers who will review and approve the task once completed by assignees.
14.The user list of selected Approvers is displayed for task completion, showing each user’s name with their role. There is also a remove option for each approver.
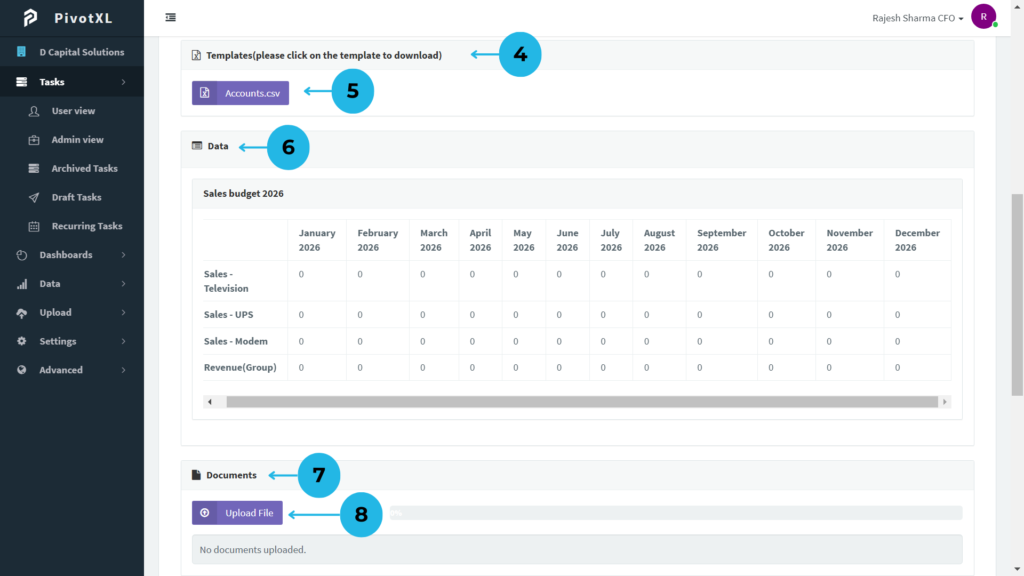
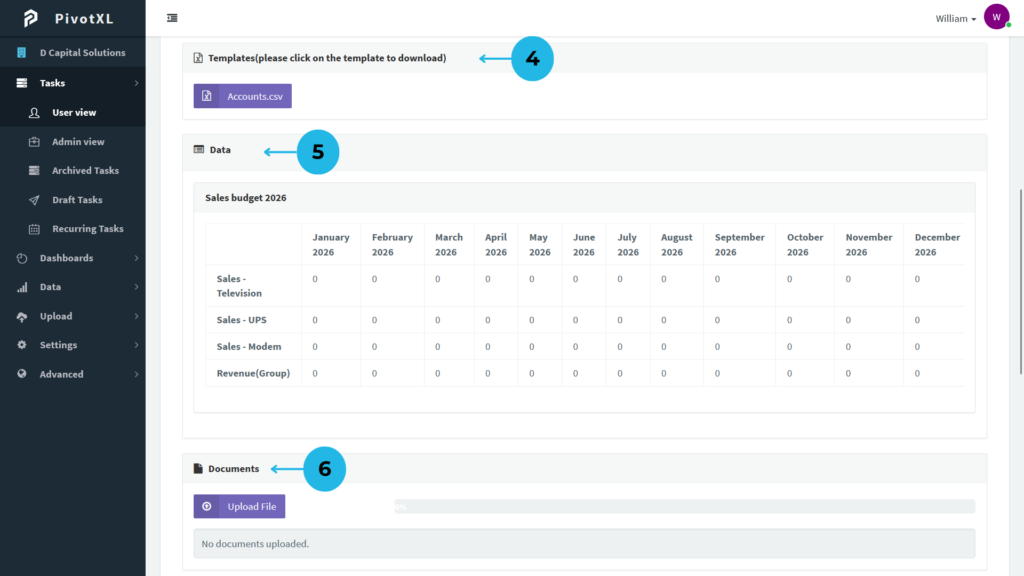
15.The Template section is used for managing templates in the task. If you need any template for the task, you can attach it in this section.
16.Click on the Edit icon to add a template to this task.
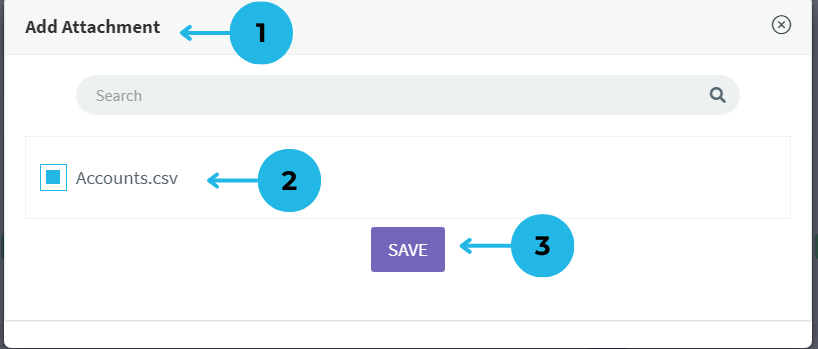
1.A new pop-up opens for attaching a template to the task.
2.Select the checkbox to add the template.
3.Click the Save button to update the template to the task.
17.After adding the template, it displays a list of templates with their respective format types.
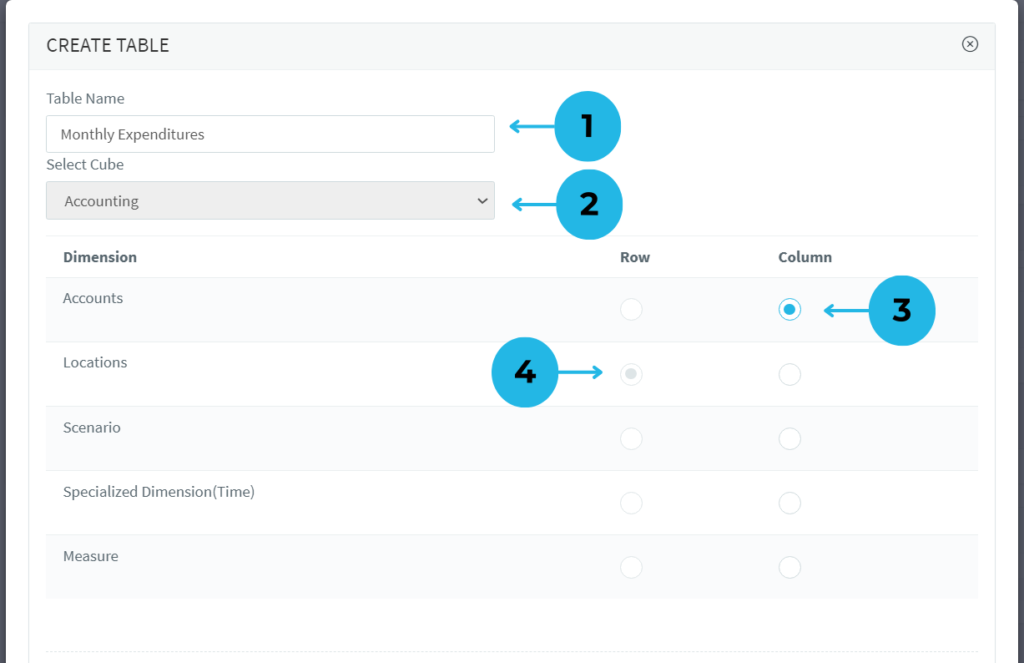
18.In the Data section, you can create a report table related to the task.
19.To create the table, click on the Add Table button.
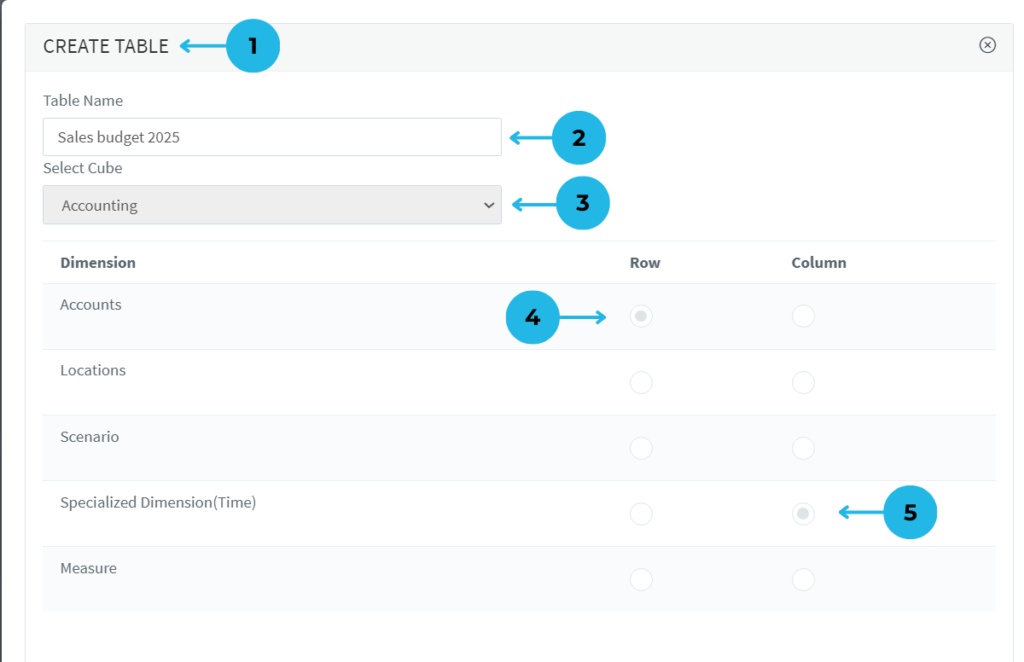
1.A new pop-up opens for creating a table in the task.
2.Provide a name for the table in the Task Name field.
3.Choose the Cube related to the report for the table.
4.Select the Accounts dimension for the row.
5.Choose the specialized time for the year-based report in the column.
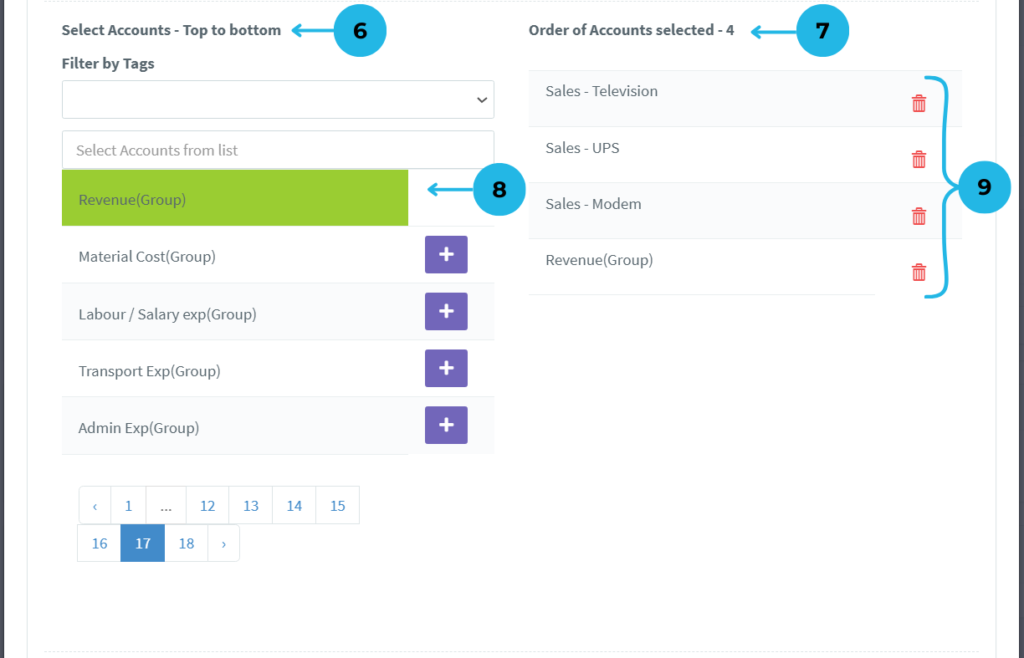
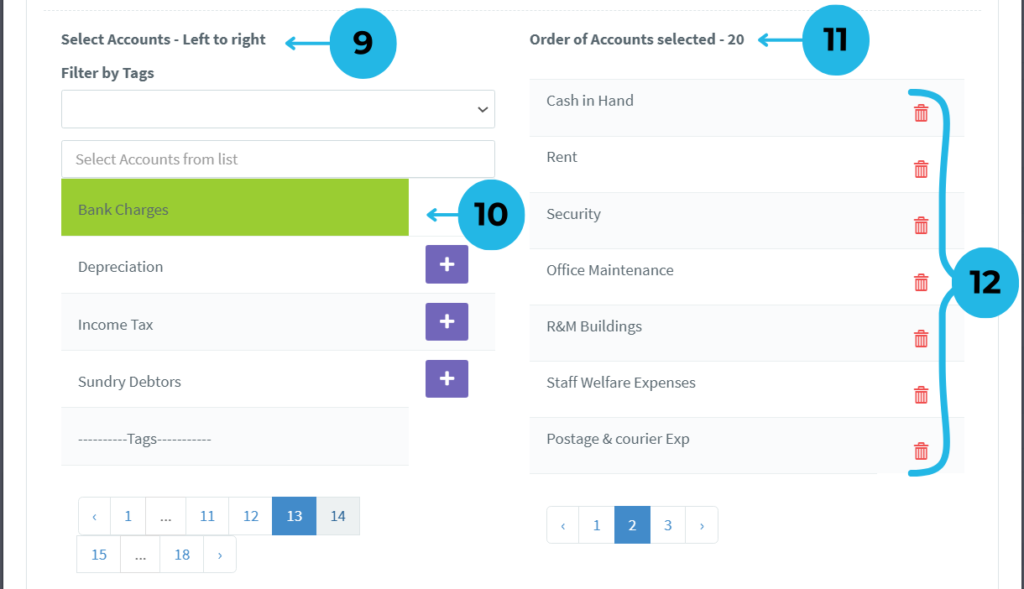
6.In the row of the table, select the accounts for the related report table.
7.The section will show the list of selected accounts with a count for the row table.
8.Click on the plus icon to select accounts from the list of Accounts.
9.You can modify the list of selected accounts; use the delete icon to remove an account.
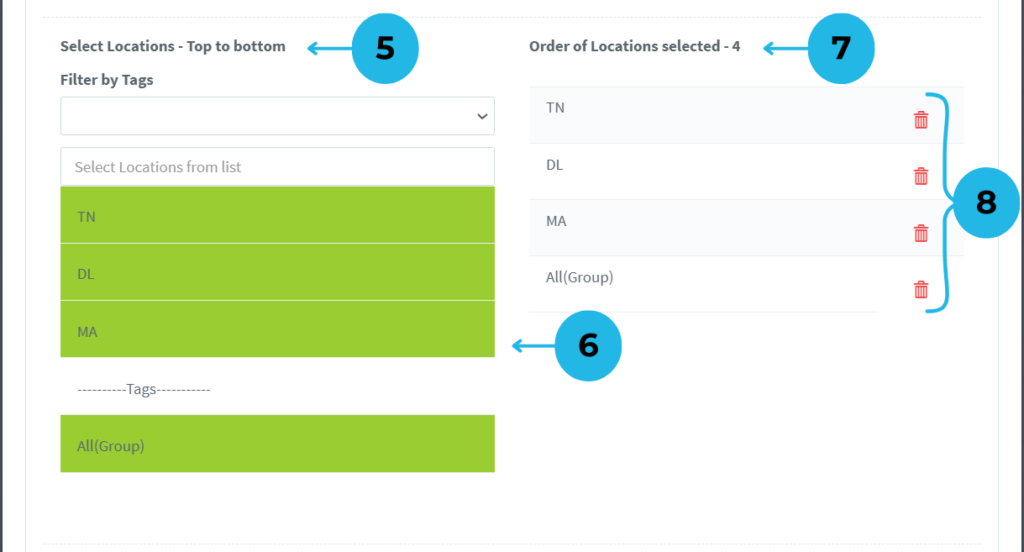
10.Select the Location Dimension for the related report.
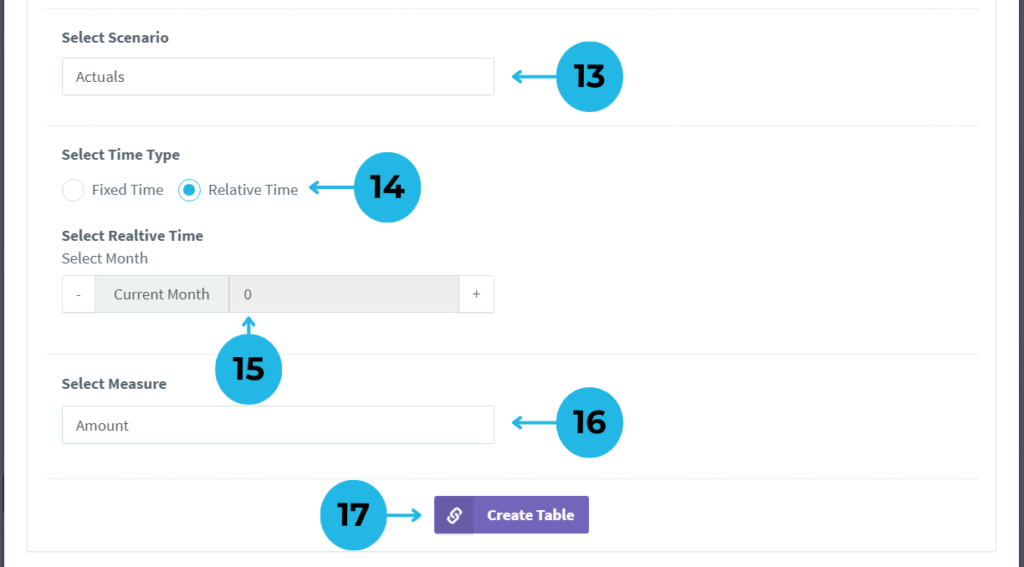
11.Select the Scenario Dimension for the related report.
12.In the Select Time Type section, choose the time for the report table.
13.Select Fixed time, and it will appear with the month and year options.
14.Choose the month (from 1 to 12) and the year (2025).
15.Click the Generate button to generate the month list of the year for selecting columns in the table report.

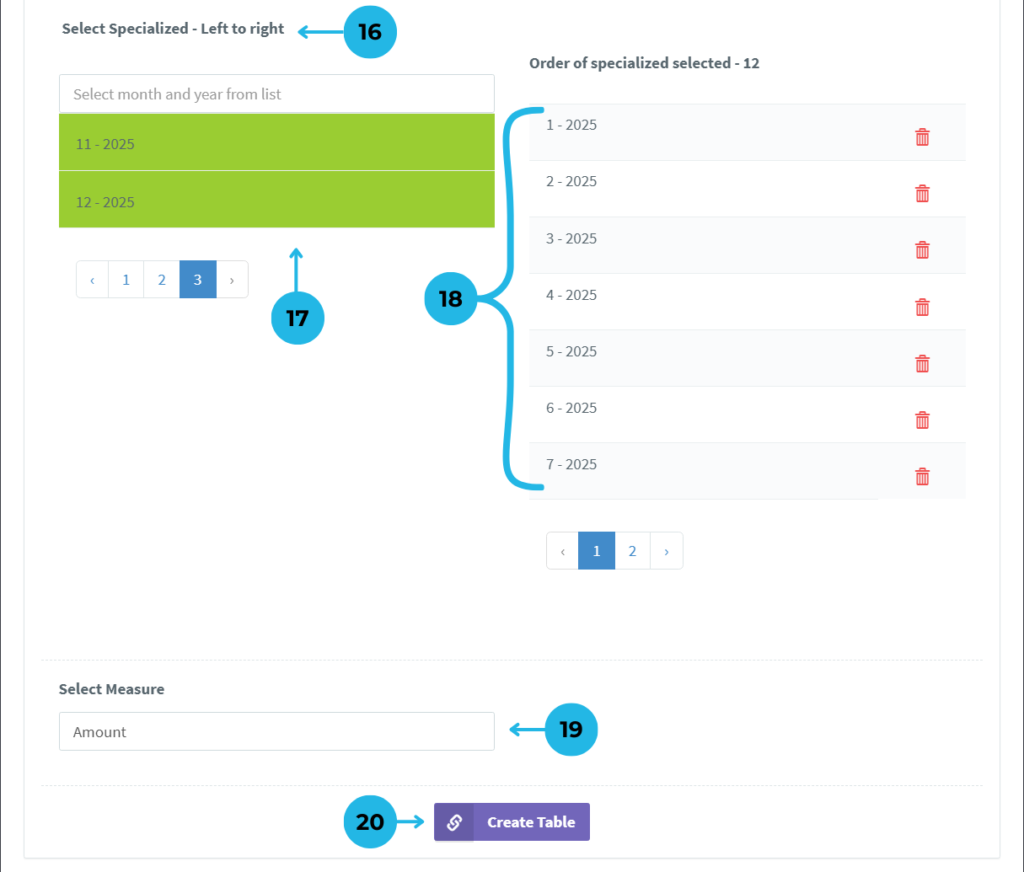
16.In the Selecting specialized time section, select the appropriate time options.
17.Click on the plus icon to select months for the column in the table.
18.The list of selected months will appear, and you can use the delete icon to remove any months.
19.Choose the Measure for the related report table.
20.Click the Create Table button to finalize the table creation, ensuring all information is correct before proceeding.
20.After creating the table, it displays the table with its table name.
21.To edit the table values, click on the Edit button within the table.
22.Click on the Settings icon to edit the table settings.
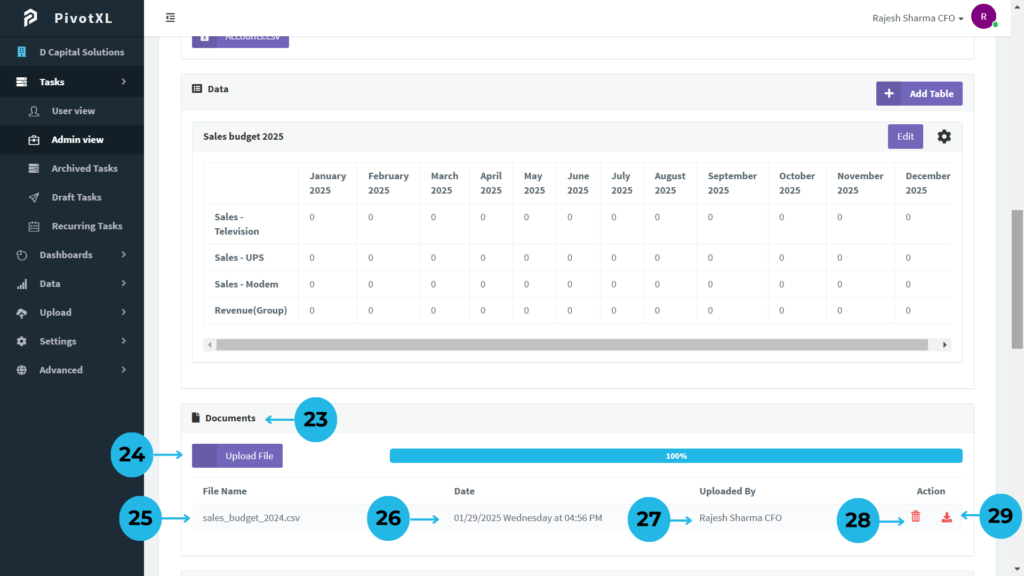
23.The Documents section is for uploading and downloading reference documents related to the task.
24To upload documents, click on the Upload File button, choose the file, and upload. Once uploaded, the progress will show 100% to confirm the file has been uploaded.
25.The file list displays the name of the document with its file format in the File Name section.
26.The Upload Date of the document is displayed.
27.The Uploaded By section shows the user who uploaded the document.
28.Click on the Delete icon to remove the uploaded document.
29.Team users can download documents by clicking the Download icon.
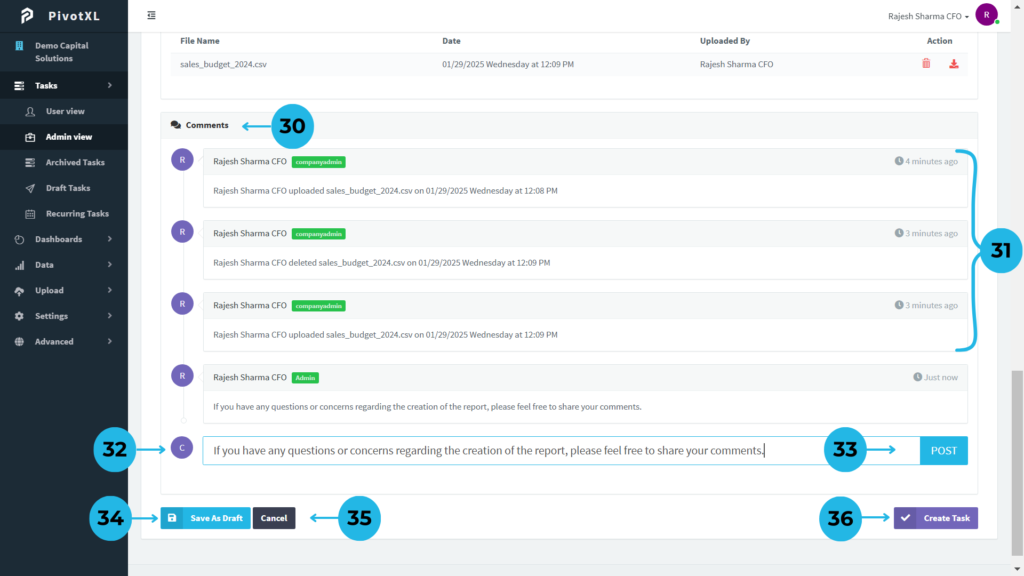
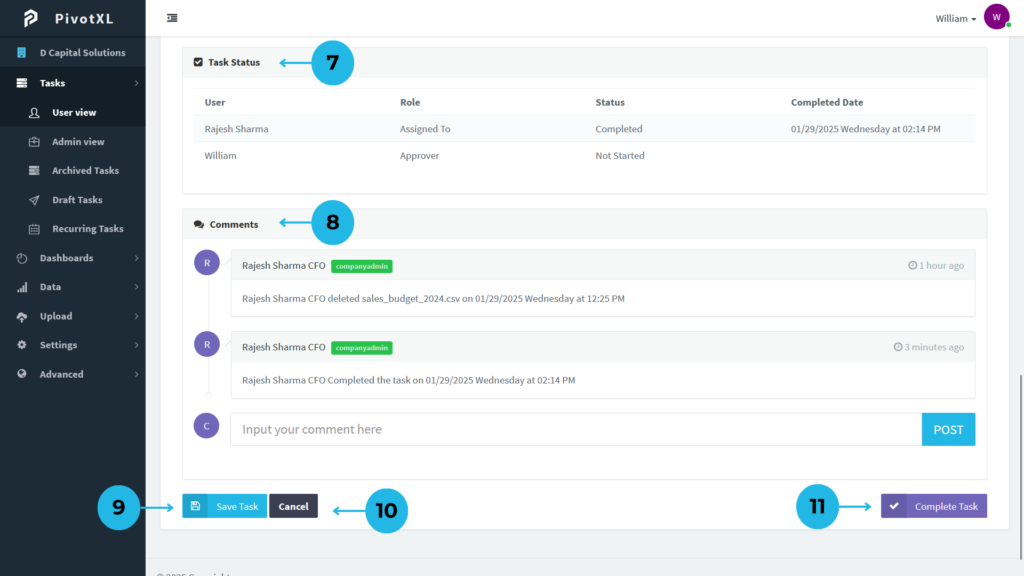
30.In the Comments section, you can easily communicate task-related information with the team. It also shows task logs from creation to completion.
31.The Logs report shows what happens during the task, allowing users to see the task’s progress from creation to completion.
32.Use the comment box to type comments related to the task.
33.Click the POST button to post comments.
34.If you need to stop creating the task, don’t worry! We provide the Draft Task feature. Click Draft Task to save the task as a draft.
35.To stop the task creation permanently, use the Cancel button.
36.Once you’re sure the task is arranged correctly, proceed by clicking the Create Task button. If any issues arise after task creation, you can always use the Edit option to modify the task in Admin View.
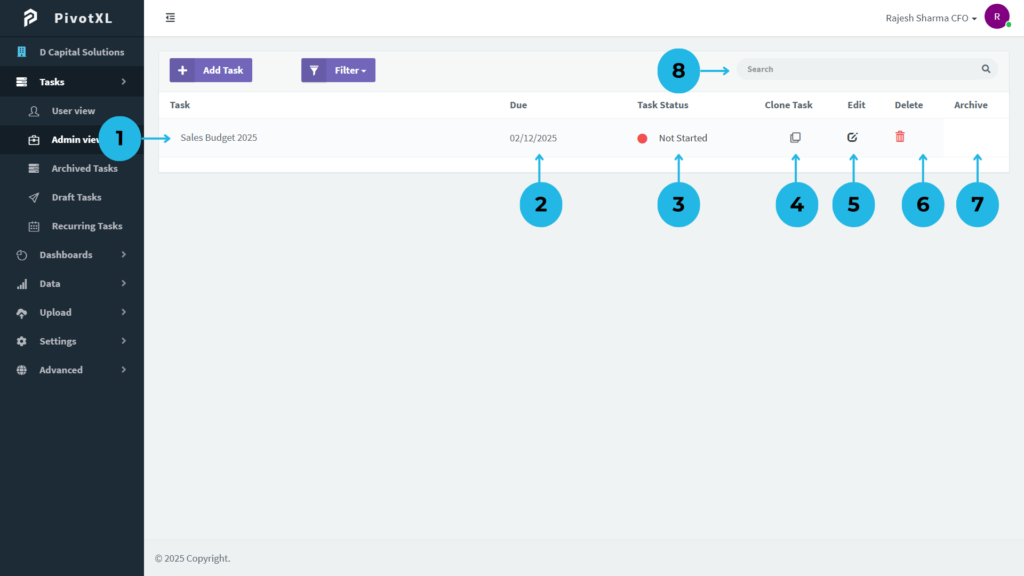
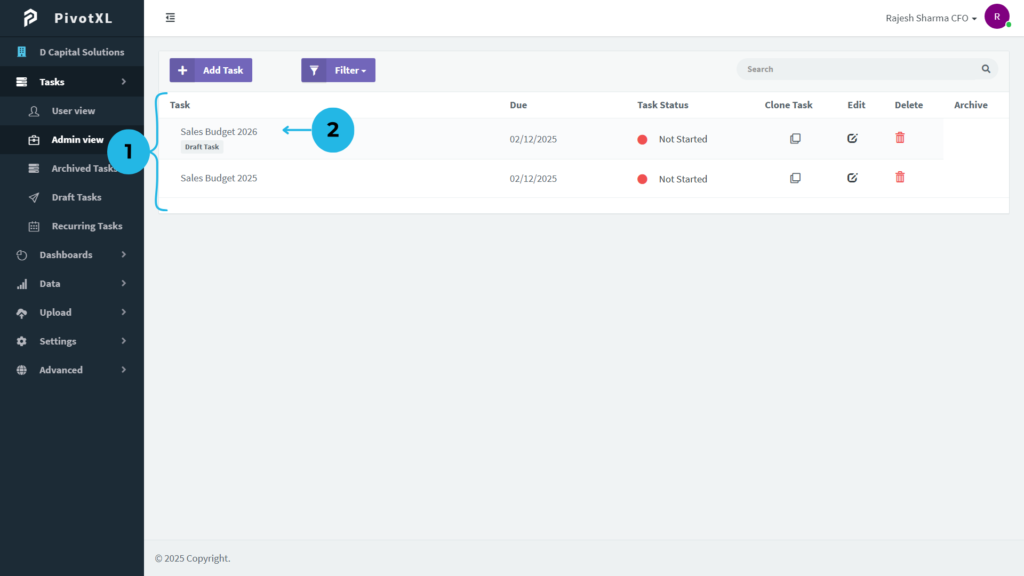
1.After creating a task, it appears in Admin View, displaying the task name in the Task section.
2.The task due date is shown in the Due section.
3.Task progress is visible in the Task Status section.
4.To easily copy a task, click the Clone icon in the Clone Task section.
5.Modify the task by clicking the Edit icon in the Edit section, allowing you to adjust any task details.
6.Delete tasks effortlessly by clicking the Delete icon in the Delete section.
7.The Archive section displays an icon when the task is completed. You can update and send the task to the Archive Task menu by clicking the Archive icon.
8.Use the Search Bar to quickly find specific tasks.
Task Cloning for Effortless Replication
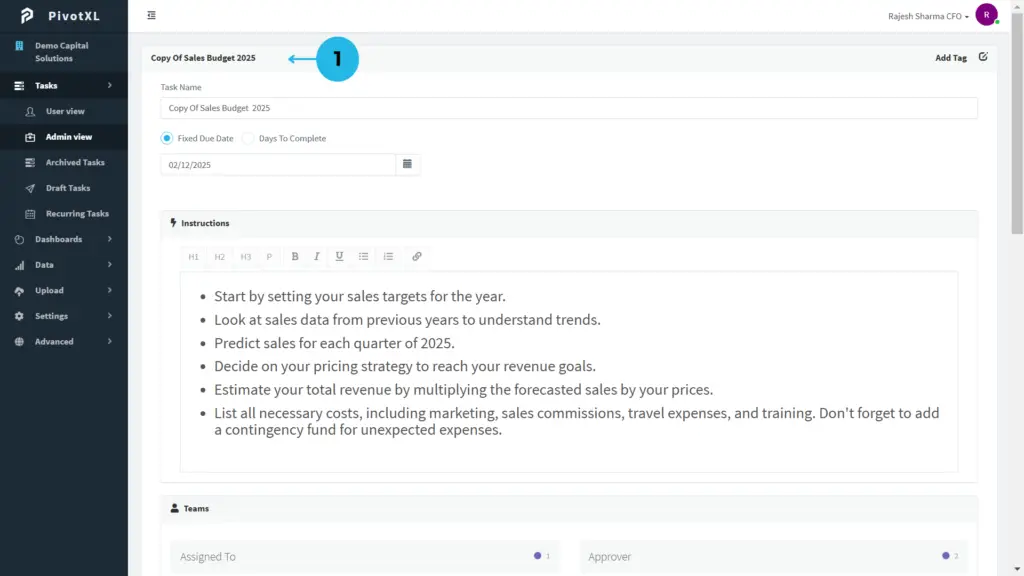
1.A new pop-up opens for cloning the task, automatically updating the task name with ‘Copy Of’ followed by the task name.
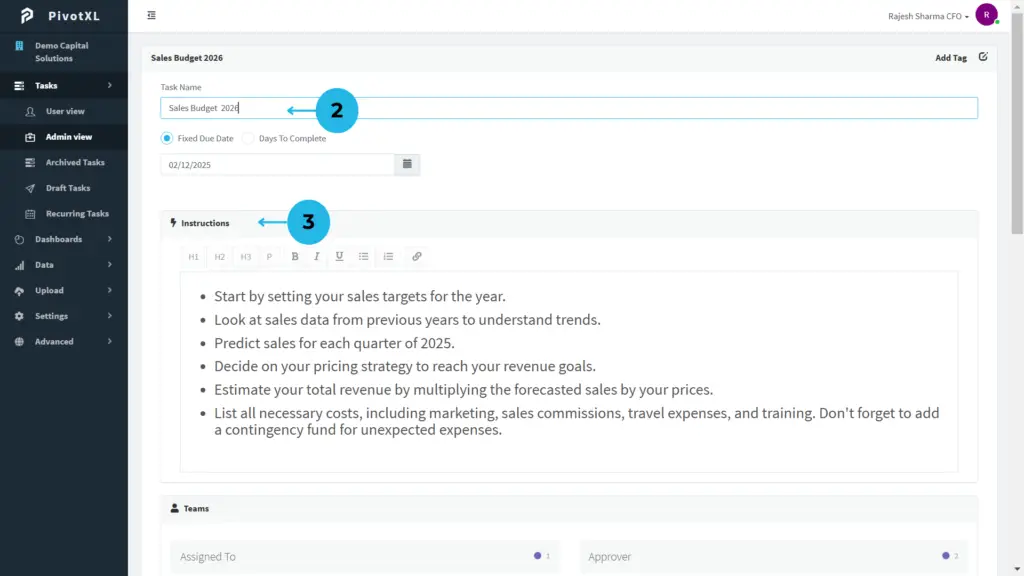
2.Modify the task name as required and set preferred task due dates.
3.Update the Instructions to fit the task requirements.
4.Assign Teams, managing both assignees and approvers.
5.Edit the Template to select your preferred template for the task.
6.Customize the table by adding or modifying tables as per task requirements.

7.Upload necessary documents in the Document section to support the task.
8.Post comments to communicate with the team and keep track of task logs.
9.Click Cancel if you want to discard updates.
10.Ensure all task details are correct and click the Create Task button to finalize the task creation.
11.If you wish to pause and revisit later, click the Draft Task button to save it as a draft.
1.The list of tasks is displayed, showcasing all active and pending tasks.
2.If the user chooses to save the task as a draft, it will be marked with a Draft Task label displayed below the task name, indicating that the task is in draft status and requires further action to complete.
Task Filtering in Admin View
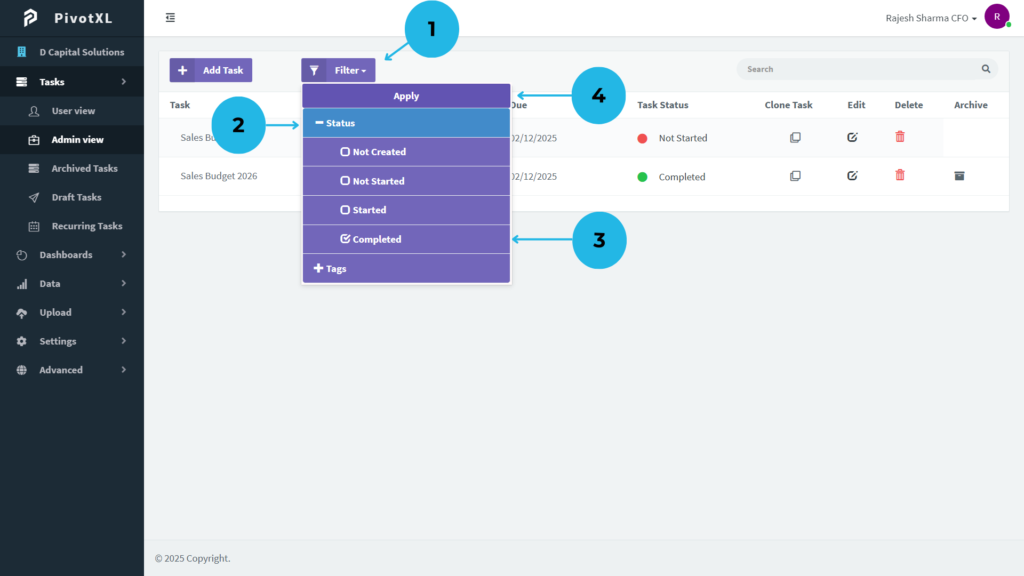
1.The Admin View displays tasks with a filter option to easily track tasks efficiently. Click on the Filter button to organize tasks based on specific criteria.
2.The filter options for status and tag will appear. Select Status to view task categories.
3.Mark the Completed status checkbox to filter tasks that have been completed.
4.Click the Apply button to activate the filter.
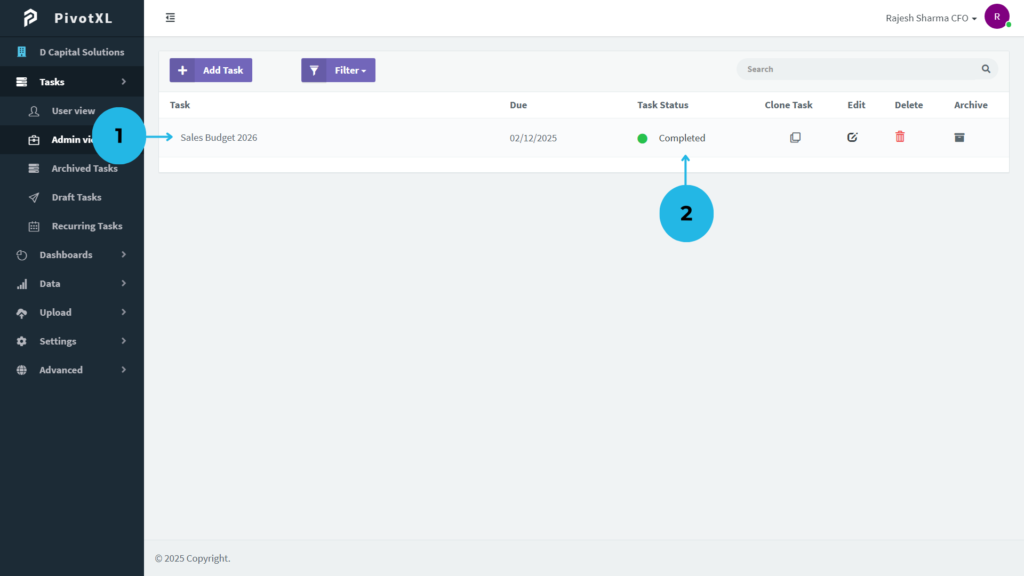
1.The task list will now show only the completed tasks, making it easier to manage and review them.
2.Completed tasks are indicated with the status completed in green for better clarity.
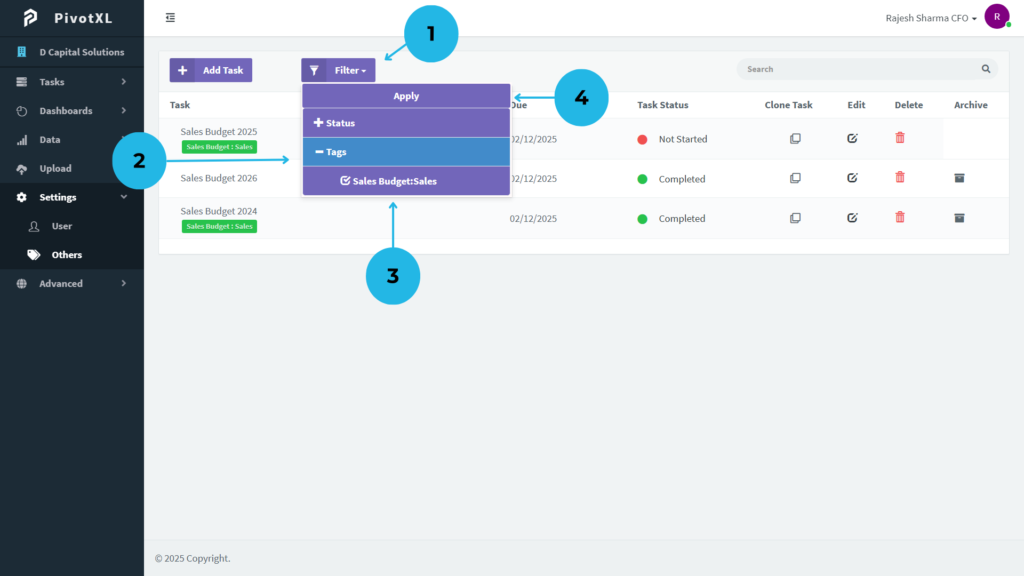
1.The Admin View offers a filter option for easy task tracking. Simply click on the Filter button to organize tasks based on specific criteria.
2.When the filter option appears, select Tag to view a list of available task tags.
3.Mark the checkbox for your preferred Tag to filter tasks according to the tag.
4.Once your tag is selected, click Apply to apply the filter.
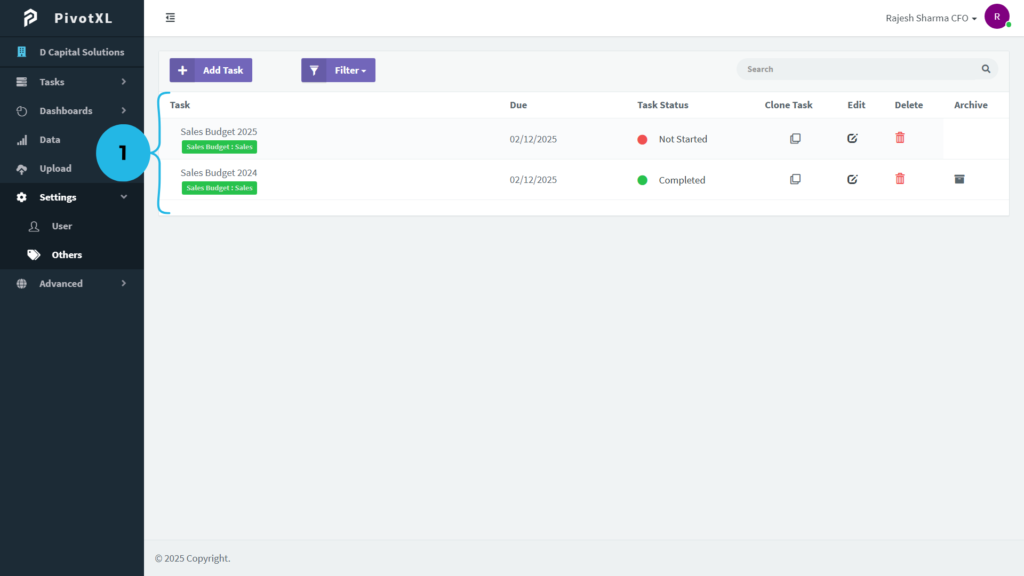
1.The filtered list of tasks will now be displayed, showing only the tasks tagged with your chosen criteria.
User View
The User View provides an intuitive dashboard that displays both pending and completed tasks, offering a clear overview of task status. Users can:
- Easily track pending tasks to prioritize their work.
- Review completed tasks for performance insights.
- Stay organized and focused with a structured task list.
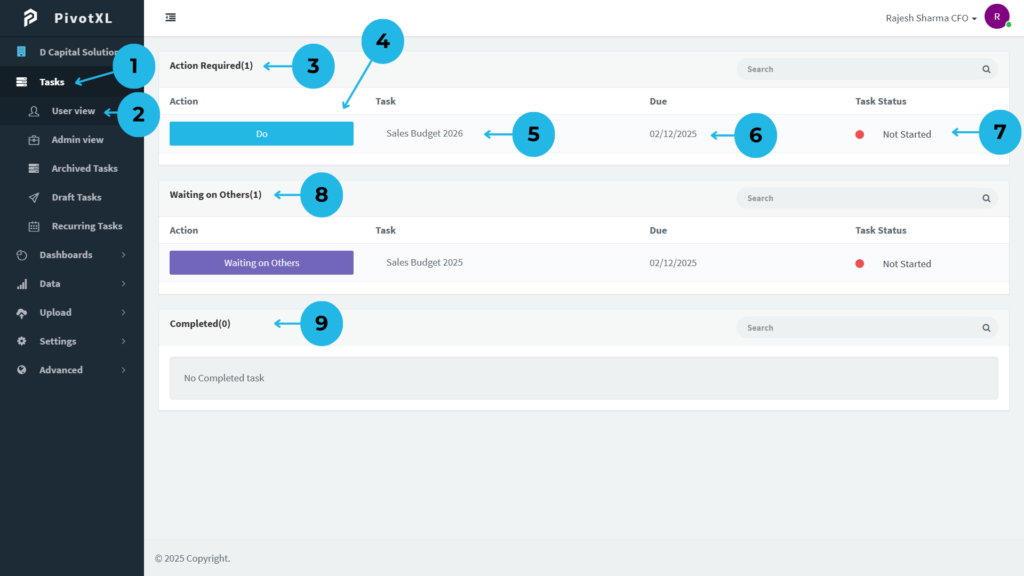
1.Upon entering the PivotXL application, simply head to the left menu and click on the “Task” menu to reveal helpful submenus for smooth navigation.
2.Click “User View” to access your task page.
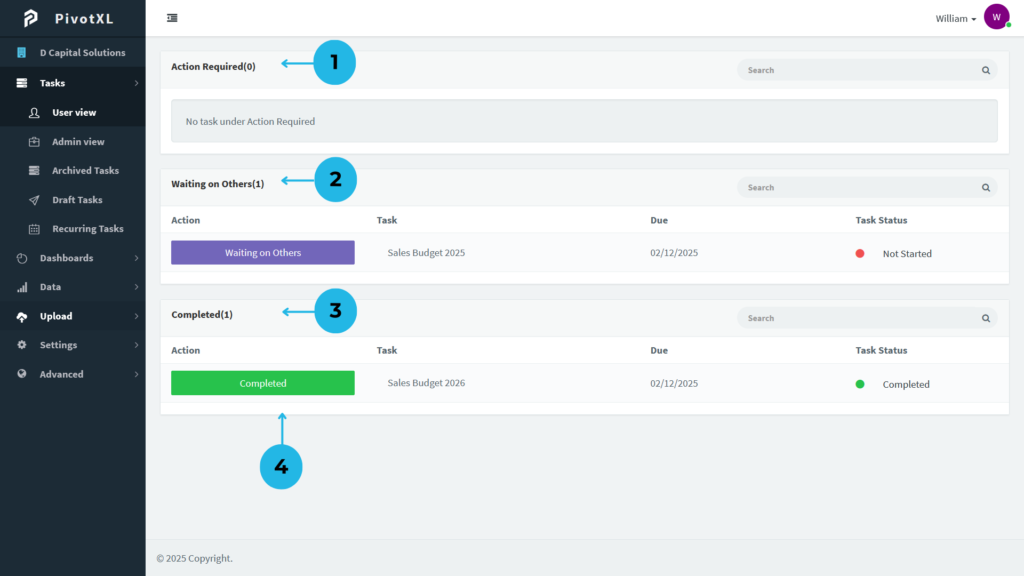
3.View your current tasks under the “Action Required” section, with all relevant task details.
4.If assigned a task, it appears under “Action Required.” Click the “Do” button to start and complete the task.
5.The task name is shown under the “Task” section for easy reference.
6.The task’s due date is displayed in the “Due” section.
7.Check the task status in the “Task Status” section to track progress.
8.The “Waiting on Others” tab shows tasks waiting for approval or action by others. This section is for viewing only, with counts shown in the heading.
9.The “Completed” tab displays your finished tasks, with a count in the heading.
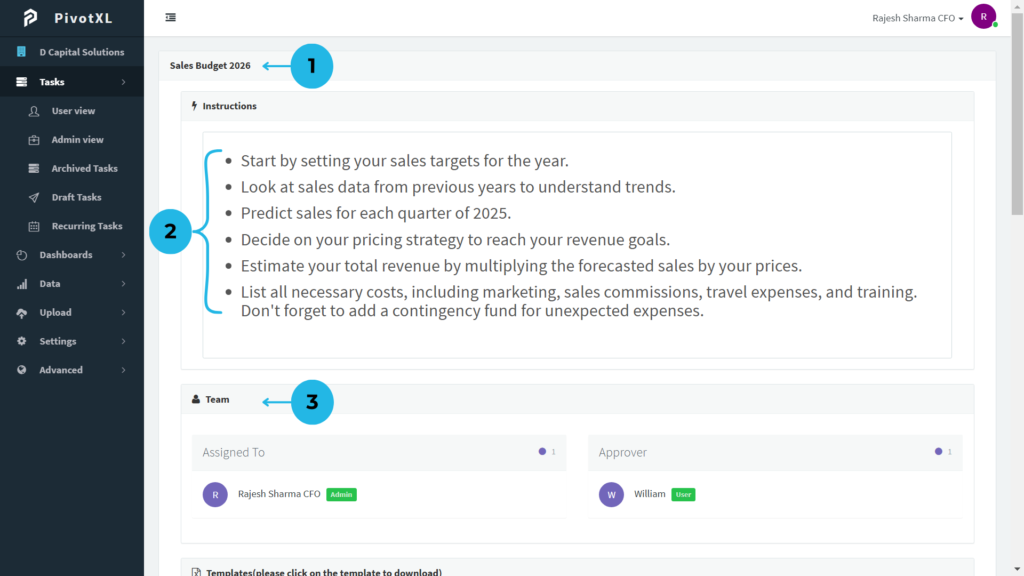
1.When working on a task, the page displays the task name in the heading.
2.View helpful task completion guidelines in the Instruction section (view only, no editing).
3.See your teammates’ task roles in the Team section.
4.The Template section lists all uploaded templates for the task.
5.Easily download templates by clicking on them.
6.The Data section displays task-related tables and reports.
7.Access the list of reference documents in the Documents section.
8.To upload task-related documents, click the “Upload File” button and track the upload progress.
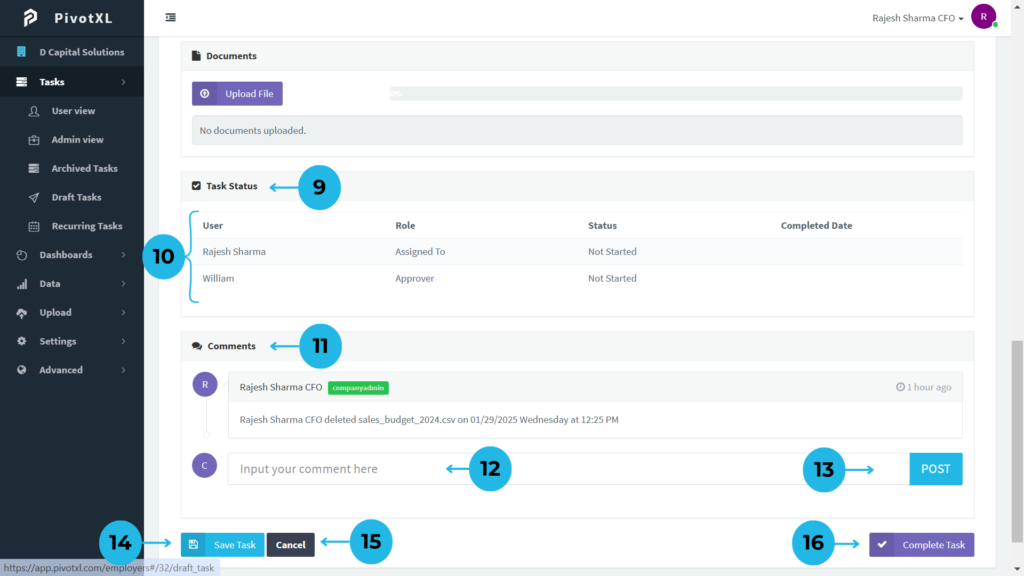
9.In the Task Status section, see the progress with user details.
10.View a list of users involved in the task, including their name, role, status, and completion date.
11.Read task logs and comments from other teammates in the Comments section.
12.Enter your thoughts or questions in the comment box to begin the discussion.
13.Enter your comments or queries in the comment box and click POST to share.
14.If you need to modify the task but aren’t done, click the “Save Task” button to save your progress.
15.Use the “Cancel” button to close the task page without making changes.
16.Ensure the task is finished, then click the “Complete Task” button to update its status.
1.Current tasks won’t appear in the Action Required section because they are already completed.
2.View the approval task list with task details. The Action section will show a message only, with no action available.
3.See the completed tasks with their details.
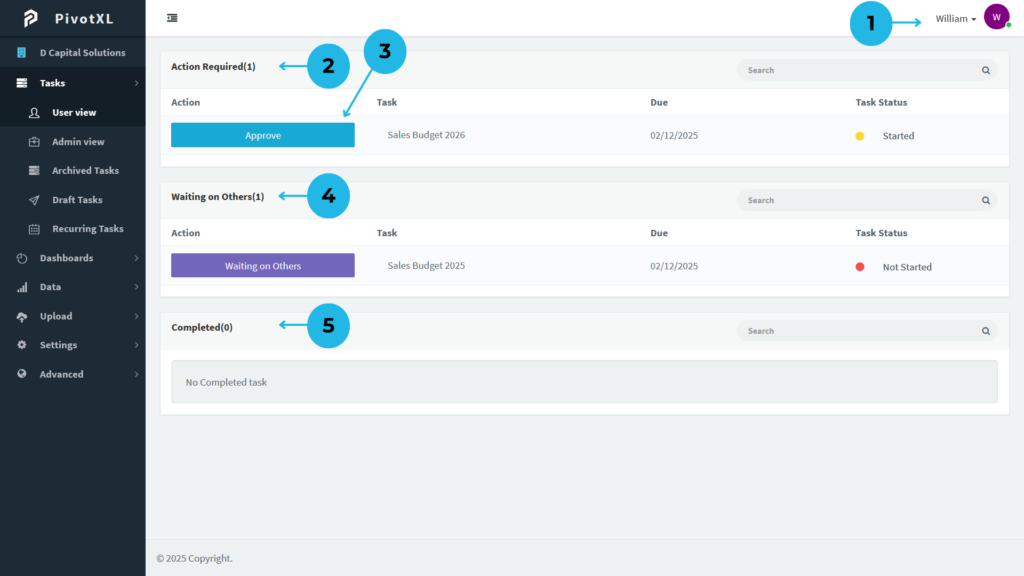
1.In the User View, log in with the task approver user account.
2.Check your tasks in the “Action Required” section, where all relevant task details are displayed.
3.If assigned to you, the task will appear in the “Action Required” section. Click the “Approve” button to approve tasks for other users.
4.View tasks waiting for approval from others in the approval task list, with relevant task details.
5.See the list of completed tasks along with their details.
1.The task name is displayed as the heading on the task approval page.
2.View task completion guidelines in the Instruction section (read-only).
3.See your teammates’ roles in the Team section.
4.The Template section lists uploaded templates. Download them by clicking as needed.
5.View task-related tables in the Data section.
6.Access reference documents in the Documents section. To upload task-related files, click the “Upload File” button and track progress.
7.View task progress with user details, including names, roles, statuses, and completion dates.
8.Read task logs and comments from teammates. Enter your comments in the comment box and click “POST.”
9.If the task isn’t complete, click “Save Task” to save your progress.
10.Click “Cancel” to close the task page without changes.
11.Ensure the task is completed correctly by the assignee, then click the “Complete Task” button to approve and update the status.
1.Upon approving a task, it is seamlessly transferred to the Completed section, ensuring better task tracking.
2.Tasks that are awaiting approval from other users or teammates will also appear under your Completed Tasks for easy reference.
3.Access a comprehensive list of completed tasks, along with their details, to stay informed and organized.
4.The Action status clearly indicates that the task is completed, signifying that no further action is required.
Archived Task
The Archived Task feature helps manage completed tasks efficiently. Key benefits include:
- Detailed Records: Maintain a history of completed tasks for future reference.
- Reactivation Option: Effortlessly reactivate archived tasks when needed, eliminating the need to recreate them from scratch.
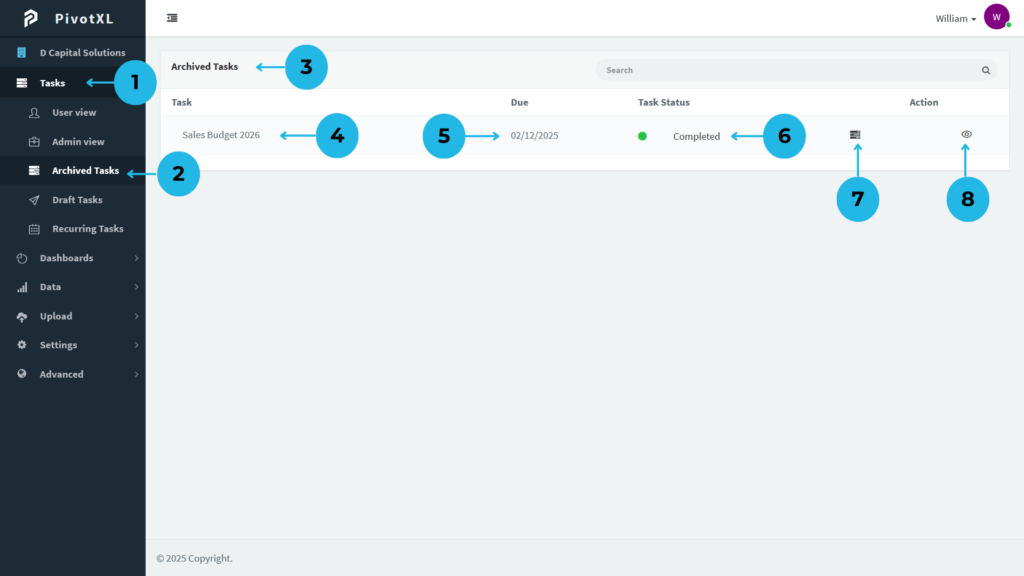
1.Once you enter the PivotXL application, navigate to the left menus and click on the Task menu. Submenus will appear under the task menu.
2.Select the Archived Task option to access the Archived Tasks page.
3.The page will display a list of archived tasks, with the heading Archived Task for easy identification.
4.In the Task section, the name of each archived task is listed.
5.The Due section shows the due date for each archived task.
6.The Task Status section clearly indicates the status as Completed.
7.In the Action section, you’ll find the icon to reactivate the task. If you need to bring a task back from archived status to active status, simply click the reactivate task icon.
8.You can easily view the task details by clicking the eye view icon. This will display the full details of the archived task for your reference.
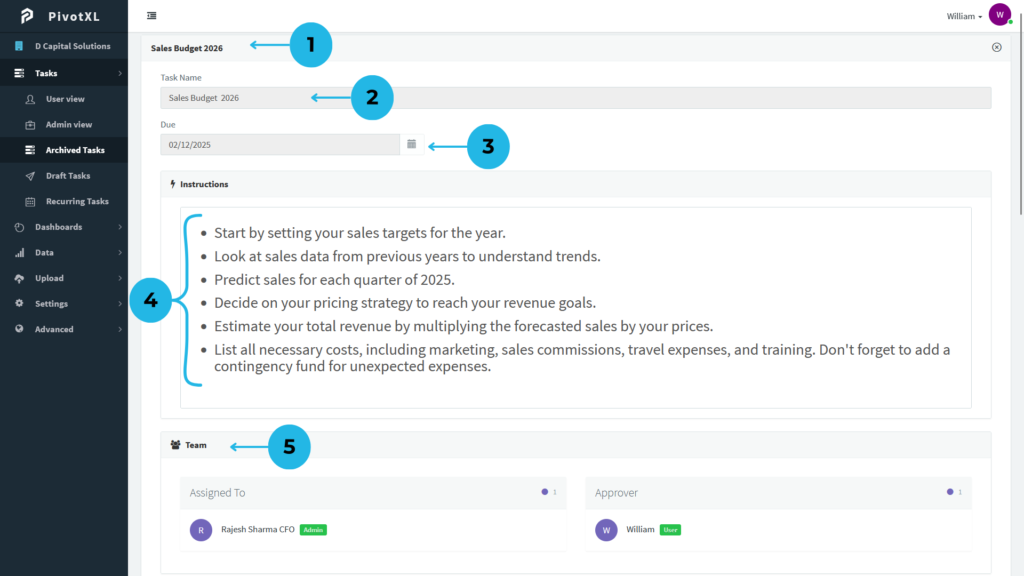
1.The Archived Task Details page opens, with the task name prominently displayed as the heading. All information is view-only, with no access for modification.
2.The Task Name section displays the specific task name for easy reference.
3.The Due section clearly shows the task’s due date.
4.Task instructions are presented in the Instructions section, offering complete visibility of the task guidelines.
5.The Team section lists details of users assigned as Assignee and Approver, providing clarity on task roles.
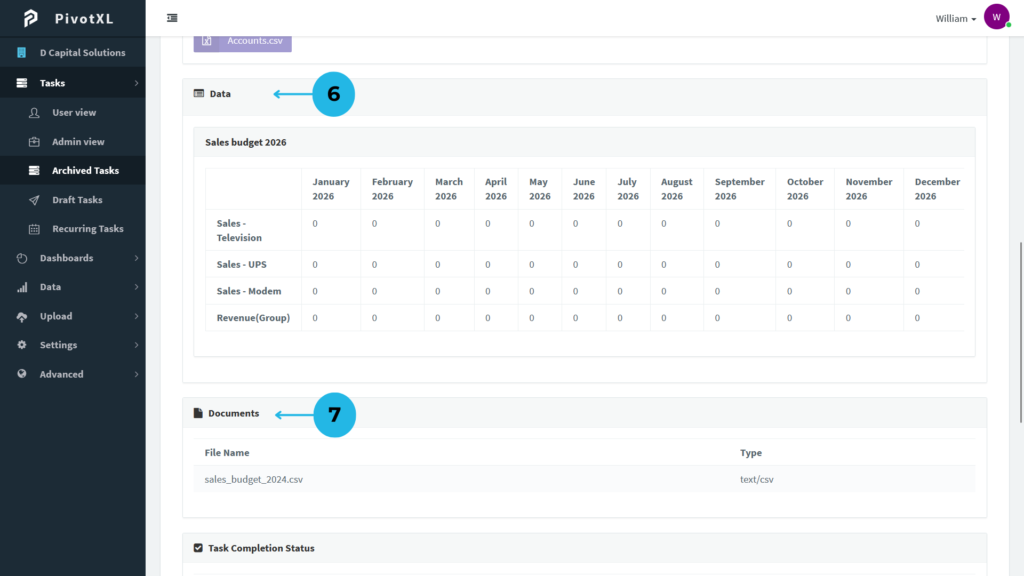
6.The Data section presents task-related report tables, offering structured insights.
7.In the Document section, you can view a comprehensive list of uploaded documents relevant to the task.
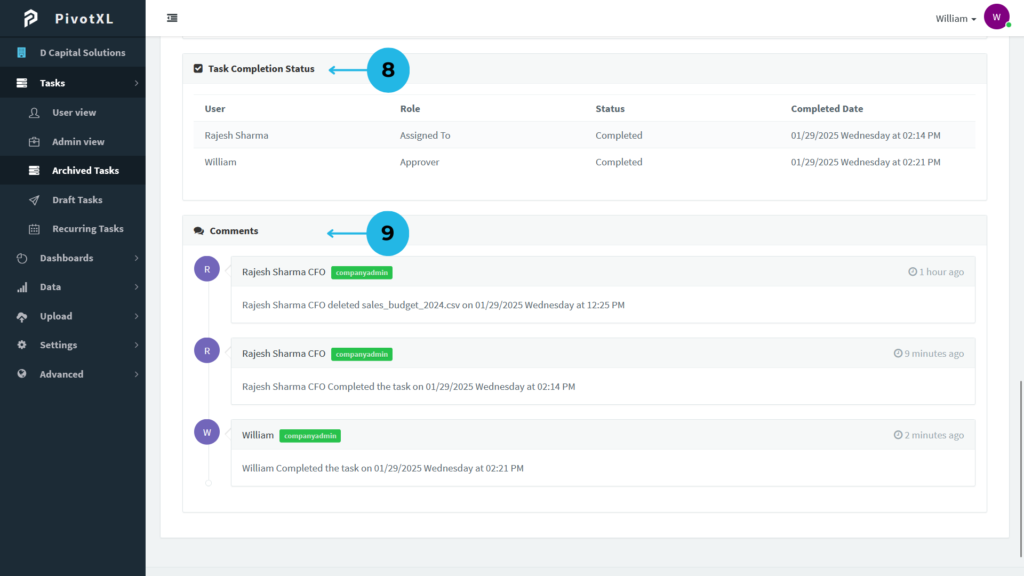
8.The Task Completion Status displays essential completion details, including user information and the completion date.
9.The Comments section displays task-related comments and logs, providing a clear history of task progress and communication.
Draft Task
The Draft Task feature allows users to manage task drafts seamlessly. It supports:
- Task Drafting: Create and save tasks without immediate assignment.
- Detailed Management: Edit and refine draft tasks before activation.
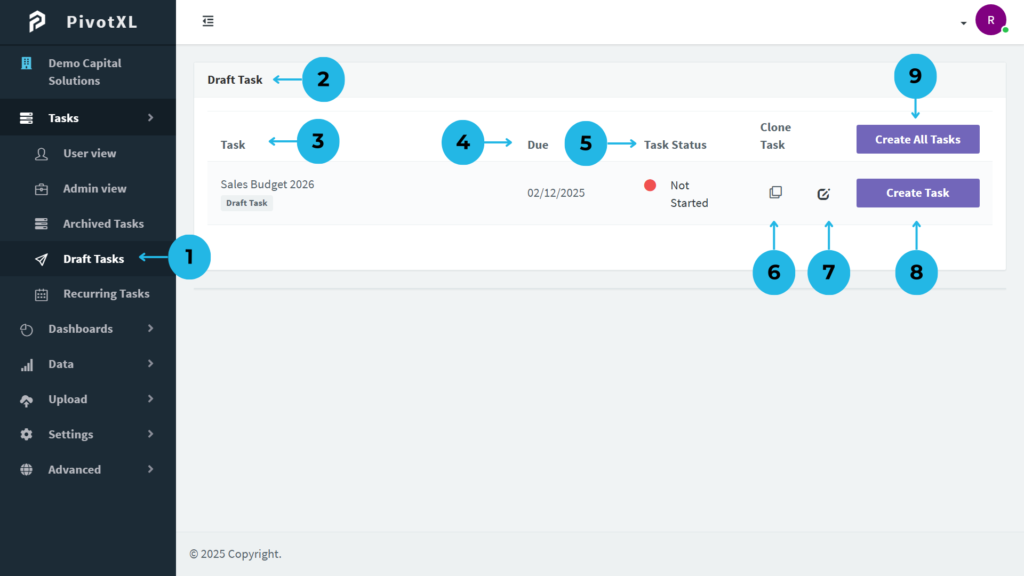
1.Once you open the Task menu in PivotXL, you will find the submenus on the left. Click on Draft Task to access the draft tasks page.
2.The page will display a list of draft tasks under the heading Draft Task.
3.In the Task section, you will see the name of each draft task.
4.The Due section will display the due date for each draft task.
5.The Task Status section shows the status of each draft task.
6.The Clone Task section allows you to replicate the original task. You can create a copy of the task by clicking the clone icon.
7.To make modifications to a draft task, click the Edit icon.
8.Easily activate a draft task by clicking the Create Task button. This will move the task to the Admin View task section.
9.If you want to activate all draft tasks at once, click the Create All Tasks button, which will move all tasks to the Admin View task section.

Recurring Task
Recurring tasks offer a powerful solution for repetitive task management. This feature provides:
- Task Automation: Assign tasks on a monthly or periodic basis automatically.
- Efficiency Boost: Eliminate the hassle of manual task assignment every month, improving productivity and workflow consistency.
Creating a New Recurring Task in PivotXL
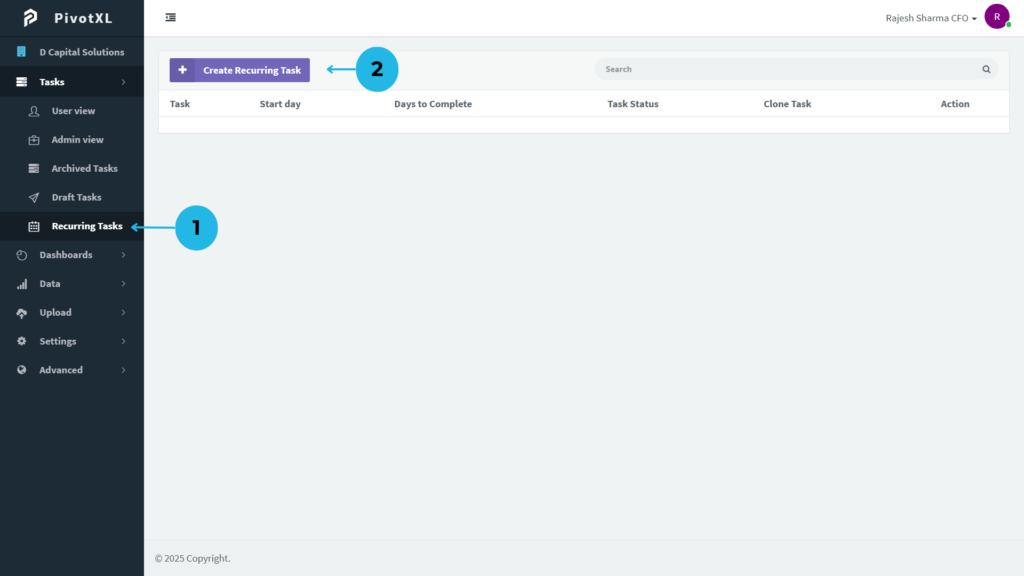
1.Upon opening the Task menu in PivotXL, the submenus will appear on the left. Select Recurring Task to access the recurring tasks page.
2.To create a new recurring task, click the Create Recurring Task button. This action opens a dedicated page for task setup, allowing you to customize recurring task details efficiently.
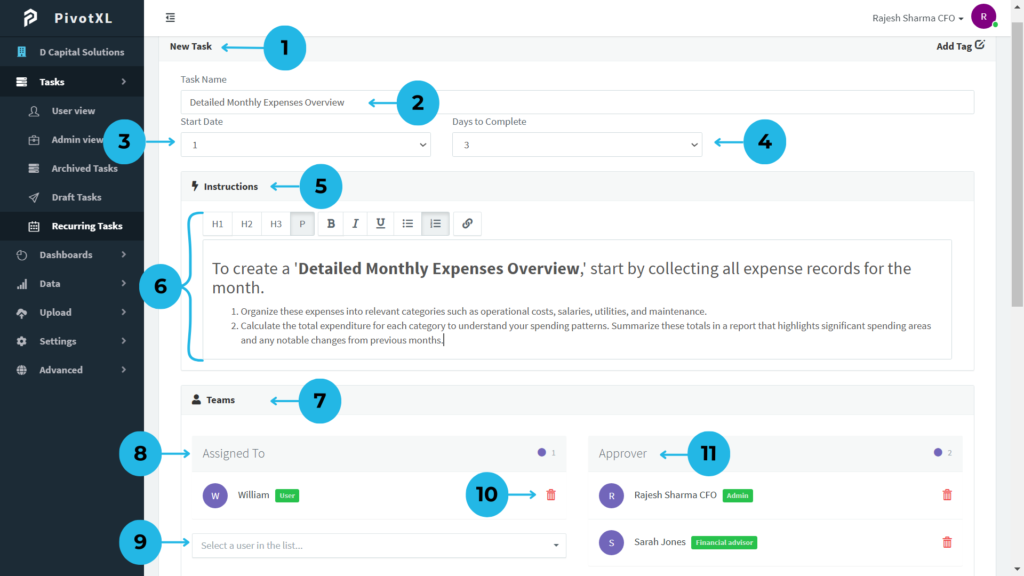
1.The page displays with a heading indicating this is a New Task. On the right side, you’ll see the Tag option. If you need to associate this task with any tag, click the Add Tag button and select your preferred task.
2.Enter the task name in the Task Name section.
3.Set the task’s Due Date for completion. Choose the Start Date when users should begin the task. Select from the available days in the month by clicking the dropdown.
4.Select the number of days to complete the task using the dropdown.
5.Use the Instructions section to provide task-related guidelines.
6.The instruction editor offers multiple tools to enhance task instructions:
- Highlight text for emphasis.
- Add numbered lists or bullet points for better organization.
- Attach external links for additional resources.
7.Navigate to the Team Section to manage task roles. Assign users as Assignees or Approvers for the task.
8.In the Assigned To Tab, select or modify users for task completion. The tab shows a count of assigned users.
9.Click on the User Selection Dropdown to assign the task to a user.
10.The User List displays selected assignees, showing each user’s name and role along with a Remove Option.
11.Use the Approver Tab to select approvers who will review and approve the task once completed by assignees. The user list of selected Approvers is displayed, showing each user’s name with their role, along with a Remove Option.
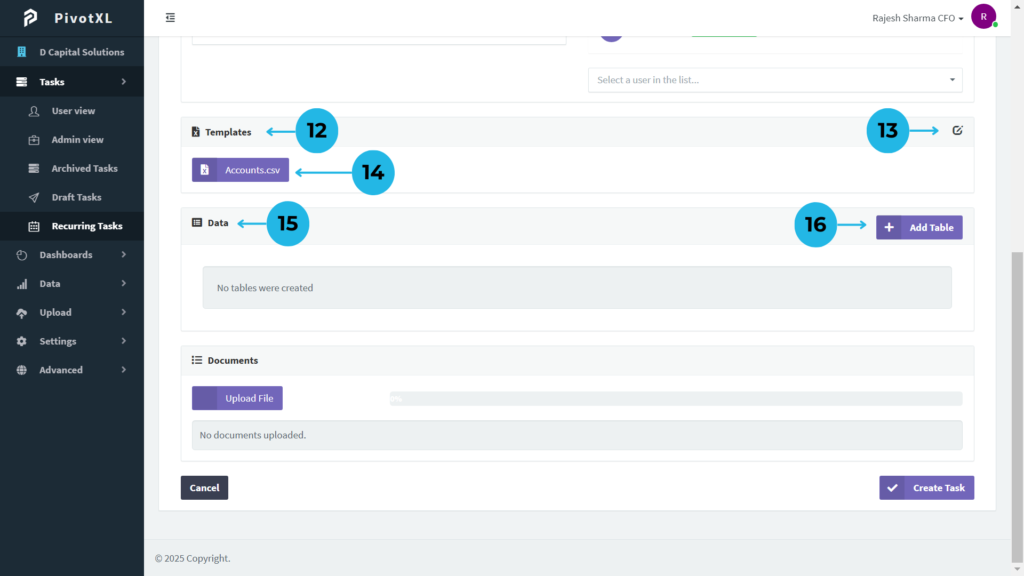
12.The Template Section is used for managing templates in the task.
13.Click on the Edit Icon to add a template to the task.
14.After adding the template, a list of templates with their respective format types will be displayed.
15.In the Data Section, you can create a report table related to the task.
16.To create the table, click on the Add Table Button.
1.Click the Add Table button to open the table setup pop-up. Provide a clear name in the Table Name field.
2.Choose the relevant Cube for the table report.
3.Mark the Accounts Dimension to organize column data.
4.Select the Location Dimension to structure table rows.
5.Select the Location Dimension to structure table rows.
6.Click the Plus Icon (+) to choose locations. After clicking, the icon changes to green to confirm selection.
7.View the selected locations along with their counts.
8.See the list of selected locations with a count and use the remove option to modify.
9.Select the Accounts Dimension to structure table columns.
10.Click the Plus Icon (+) to choose accounts.
11.See the selected accounts list with a count
12.Use the remove option separately to adjust if needed.
13.Choose the appropriate Scenario Dimension for the report.
14.Choose Relative Time for month-based reports.
15.Use the Plus (+) Button for future months, the Minus (-) Button for past months, and note that 0 represents the current month.
16.Choose the correct Measure for accurate reporting.
17.Ensure all selections are correct. Click Create Table to finalize and generate the table.
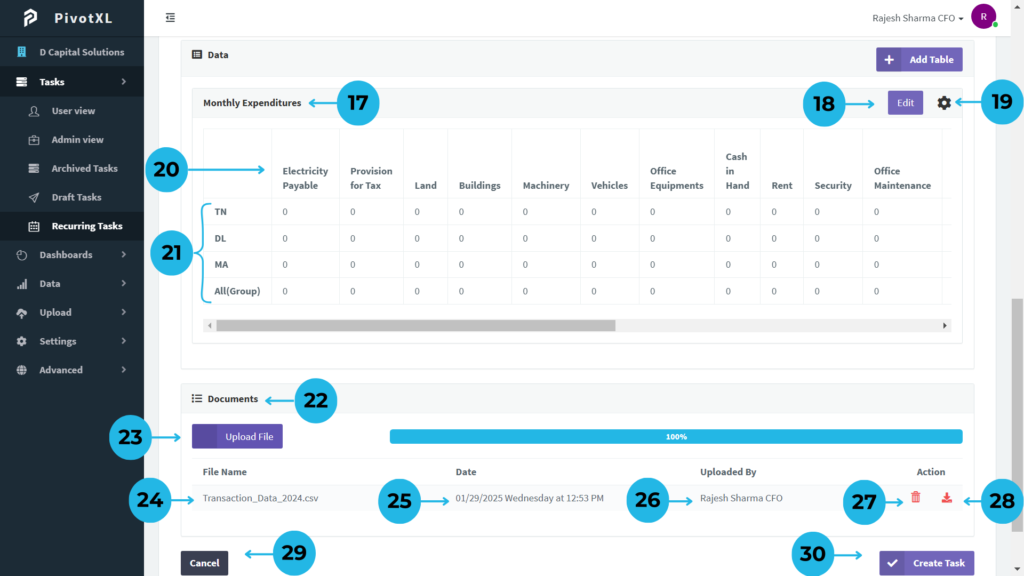
17.The created table is displayed in the Data Section, clearly identified by its Table Name for easy reference.
18.To update values within the table, simply click the Edit Button and make your modifications effortlessly.
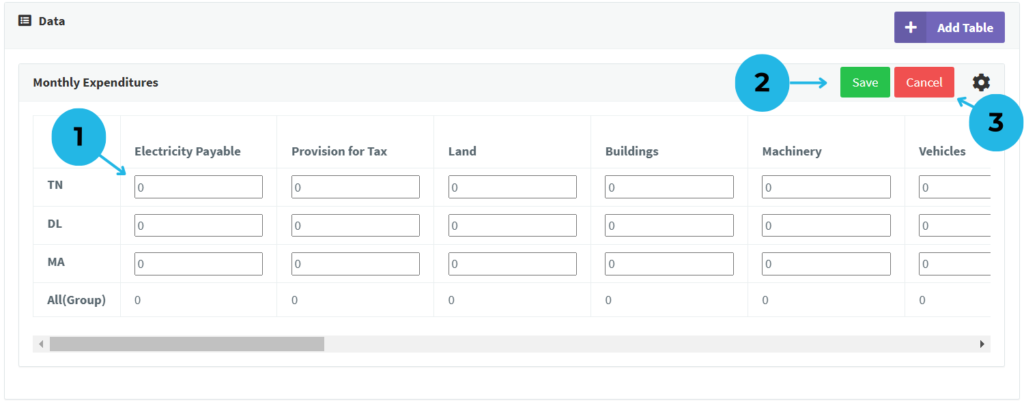
1.Click the edit option to change values directly in the input boxes.
2.Click the Save button to update the table with your new values.
3.Click Cancel to exit edit mode without saving changes.
19.For advanced configurations, click the Settings Icon to modify the table settings as needed.
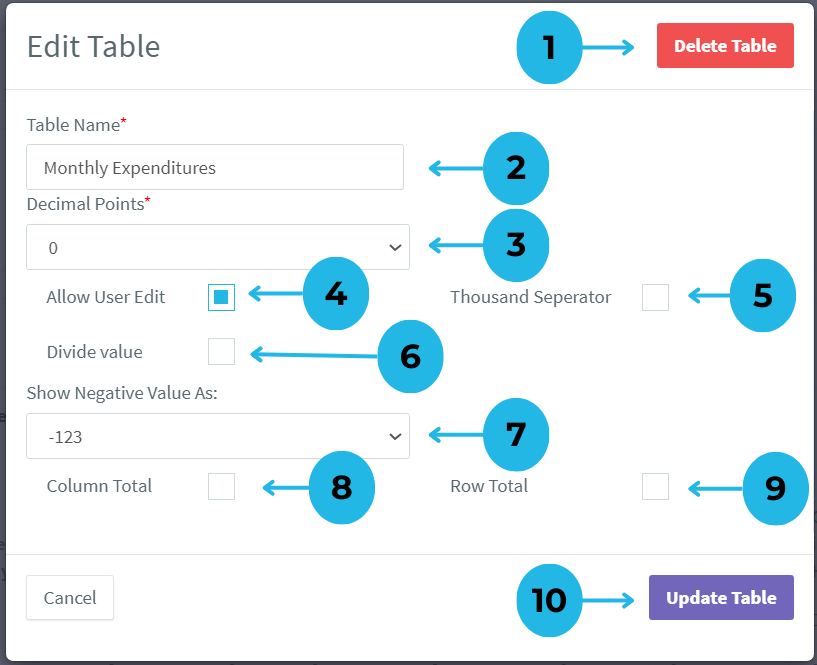
1.Remove the table from the task by clicking the “Delete Table” button.
2.Quickly change the table name as needed.
3.Adjust table values to display with decimal points by selecting the format from the dropdown.
4.Control who can edit the table by checking “Allow Users Edit“. Unchecked means no edit access.
5.Display values with a thousand separator by using the checkbox.
6.Display values with a thousand separator by using the checkbox.
7.Choose how negative values are shown in the table via the dropdown option.
8.Use the checkbox to update all total values to a new column and show column totals.
9.Use the checkbox to update all total values to a new row and show row totals.
10.After modifying settings, click the “Update Table” button to save changes.
20.The Columns Section of the table showcases the list of selected accounts defined during table creation, providing structured insights.
21.The Rows Section highlights the selected locations, ensuring comprehensive data organization from the moment of table setup.
22.The Documents Section is for uploading and downloading reference documents related to the task.
23.To upload documents, click on the Upload File Button, choose the file, and upload it. Once uploaded, the progress will show 100% to confirm the file upload.
24.The file list displays the Document Name with its format.
25.The Upload Date is displayed.
26.The Uploaded By Section shows the user who uploaded the document.
27.Click on the Delete Icon to remove the uploaded document.
28.Team users can download documents by clicking the Download Icon.
29.To stop task creation, use the Cancel Button.
30.Once you’re sure the task is arranged correctly, proceed by clicking the Create Task Button.
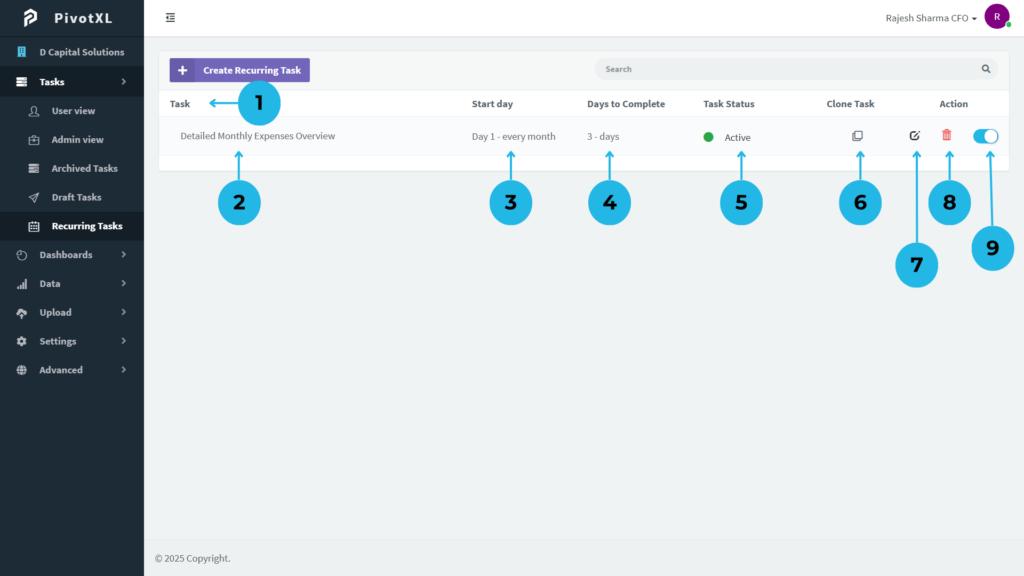
1.After creating a recurring task, view a detailed list of tasks.
2.See the task name under the Task section.
3.View the task’s starting date in the Start Day section.
4.Check the number of days to complete the task in the Days to Complete section.
5.Easily monitor task progress in the Track Status section.
6.Instantly duplicate tasks by clicking the Clone icon in the Clone Task section.
7.Keep tasks updated by clicking the Edit icon in the Action section.
8.Remove tasks by clicking the Delete icon in the Action section.
9.Enable or disable tasks using the active/inactive option in the Action section.

- When a task is disabled, the Task Status displays as “Inactive.”
- Inactive tasks will have the Action section in disabled mode.
Enhance Productivity with Task Management Features
PivotXL’s task management capabilities empower users to handle their responsibilities efficiently, track progress, and automate repetitive assignments. These features not only save time but also foster better organization and decision-making for teams and individuals alike.
